Good morning class, and welcome to Biker Basics 101. Today’s lesson will be more Hands® on than previous – taking notes is encouraged but not required.
Today we will be covering the basic gear, equipment and kit that you might find useful as a Bike Rider©. None of this stuff is essential in any way, shape or form – I’m not telling anyone that going out and buying more shit will make riding your bike more fun, I just think that it might be useful for some of you in the audience (that might be that-way-inclined) to make your user experience more personalised and i m m e r s i v e. There’s already a billion articles and guides that’ll pretty much explain everything I’m about to, but I thought this’d be useful to see it from the Hands® Bicycle Club perspective.
We’re gonna break this up into a couple different sections so it’s a bit clearer how it all works, where it all goes and what it’s all called. Binary Code is stuff that should be regarded as essential equipment needed pon road. You and your bike will work without these things but if the bike encounters an error – ya probably gonna be walking home without these bits. Hardware will cover peripheral attachments and customisations to the bike itself. These tend to be things that’ll require access to maybe some Allen keys, spanners and time most importantly. Finally, Software will be a list of form+function based additions you can pick up fairly cheaply that let you get more out of your bicycle’s carrying ability whilst adding some much enjoyed Flare™.
Here’s a contents page for you to jump to each section with ease:
Binary Code
Hardware
Before we start, it’s also worth mentioning that Hands® is an open-to-all bike club. That basically means that no-one gives a shit what bike you’re riding, as long as you’re riding it. That extends to the style of riding too: No one gives a shit where/how far/ how fast/ how slow you ride, as long as you’re having fun. These two understandings have, therefore, informed the way our bikes are put together. You’ll find a majority of the Whips® seen in our photos will fall into the category of ATB (All-terrain-bike). This can obviously be any fucking bike on earth but stylistically, (’cause I’d be lying if I said Hands® didn’t have a style lol) that normally ends up being 80/90’s Steel Mountain/Touring bikes. There’s a lot of terms for these at the moment: Rat Bikes, Restomods, Super Commuters, Hillibikes, Klunkers etc – the list goes on forever. I’m telling you this because what I’m about to show you should work on most, normal bikes (there’s your A & T from ATB). If you wanna ask me if you can fit a basket rack on a carbon fork with bald-skinny tyres, I’m probs not gonna be able to tell you if it’ll work or not – ask me if it’ll go on the old Muddy Fox frame you’ve had in the shed since ’92, I’ll most probably tell you that you could mount 2 of ’em. Know what I mean? anyway, lets get into it.
Binary Code
Lights
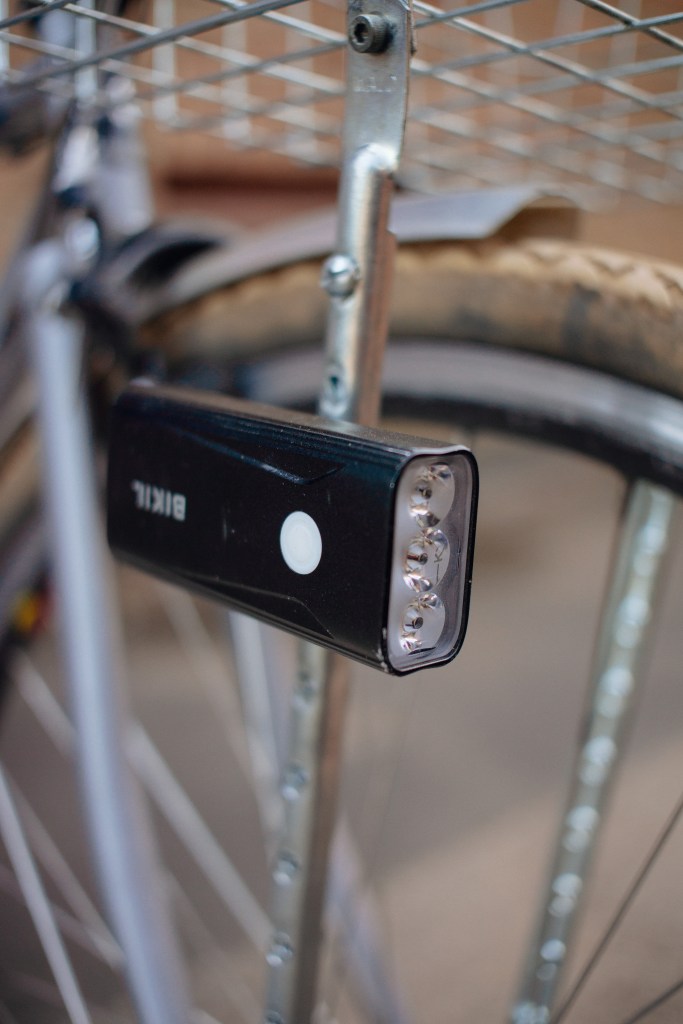
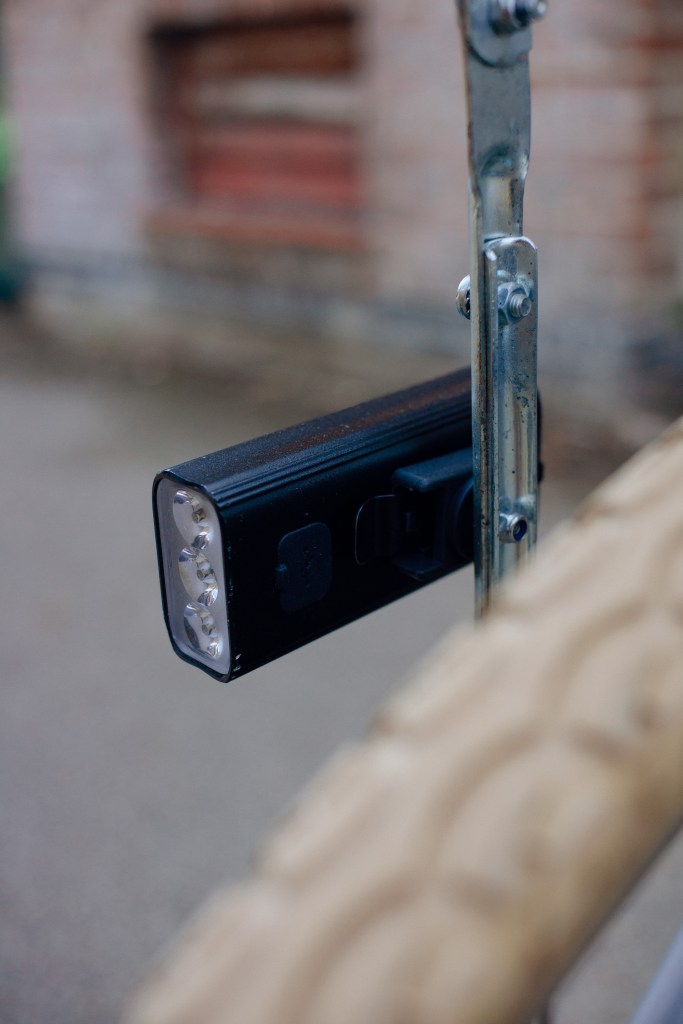
The absolute worst thing to do, and you definitely would have done it at some point, is ride home from somewhere in the dark. Our eyes didn’t evolve to the point they have, uniquely reliant on light and its other sources in order for us to visibly see (and be seen) for us to then ride our bicycles in the pitch black. It doesn’t matter how many carrots you’ve eaten, put a light on your bike.
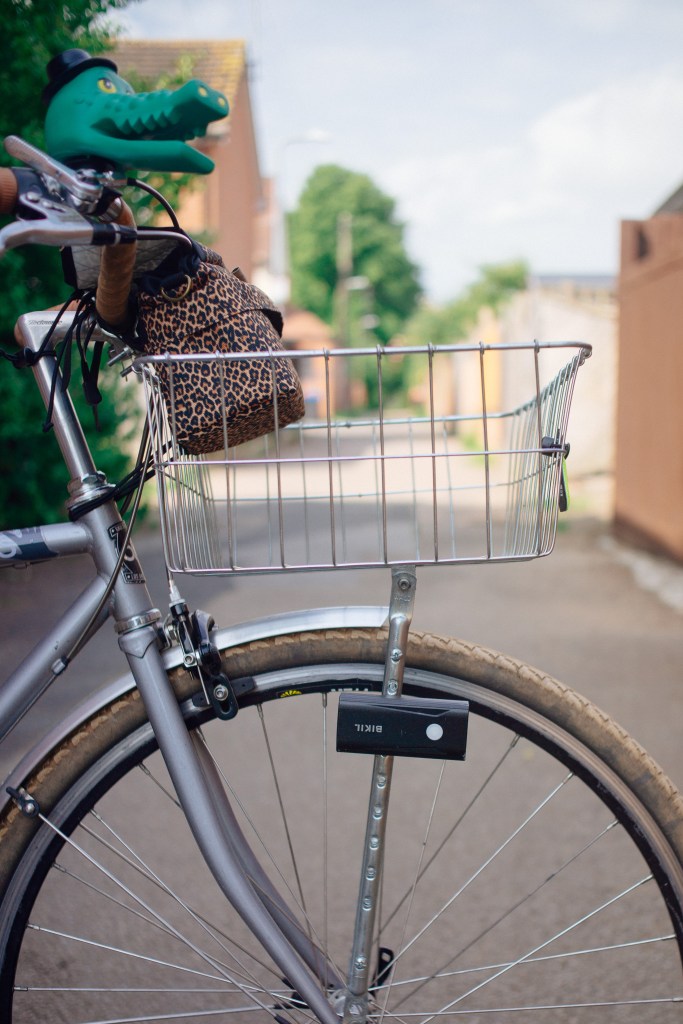
Most come with one of those adjustable clamps to put on your handlebars, but if you’re handy with the tool, you can mount them to random bits of your bike too. I’ve mounted mine to the base of my front rack; the beam is lower to not dazzle pedestrians and drivers, but still well-placed to light up the path in front of you without shadows from cabling/bells etc. And it looks cool.
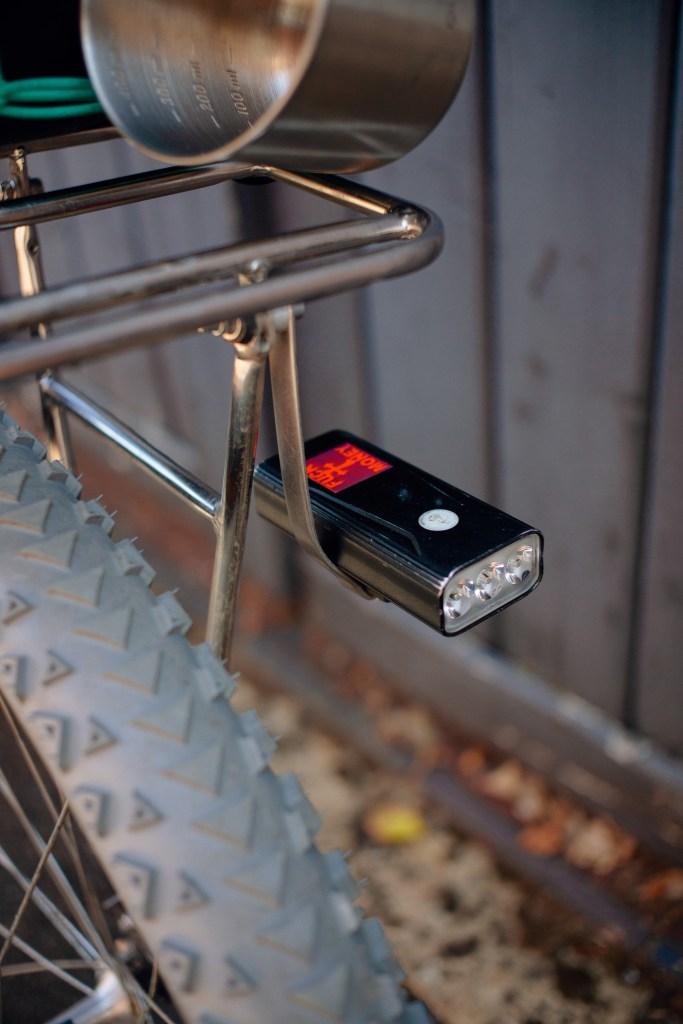
If you can afford it, get a fairly decent one too – battery life and beam strength (measured in Lumens) is worth learning about. I bought what I thought we’re ‘good’ Knog lights when I first started riding. They were well made, lasted a decent amount of time and looked great. Problem was, they lit up just about the top of my front wheel and nothing else. I had no idea there was a difference between lights that are designed for you to ‘be seen’ vs ‘actually see’. I’d bought the prior and had to traverse about 2 miles of almost medieval darkness with lights dimmer than a match. Of course, the lights you pick can change on the time of year too. It’s a lot lighter for longer in summer and the cold of winter will eat through your battery life with ease. Check ’em out, find an acceptable level of Lumens x Battery for your liking and let there be light.
P.S – Rear lights should be mandatory too, strength isn’t a necessity for these though. You don’t want to look like you’ve got one of those funny blinking red lights on the back of Formula One cars.
Bell
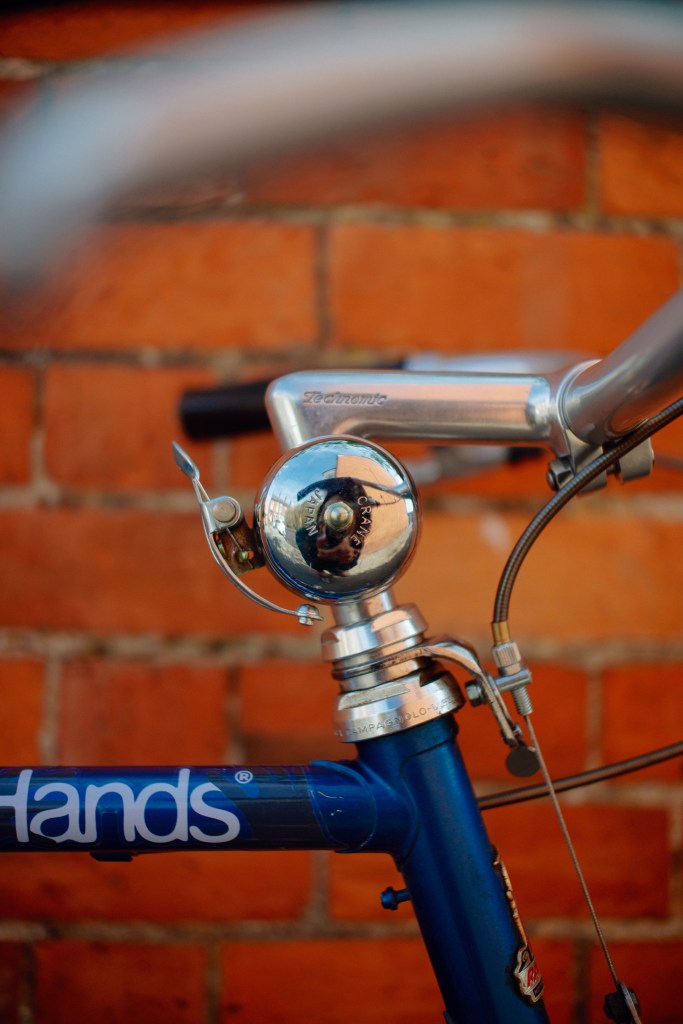

Controversial one in every sense but I think a bell should be compulsory on a bicycle, even if it isn’t socially acceptable in your Locale. It has been the universal way of making someone aware of your, or their, presence for over a century. It’s only in recent times, where I think the idea of using a bell is perceived the same way as someone using a car horn: instant aggro. Regardless of that, there are big brain essays and philosophical discussions around bell etiquette and that is a lesson for another day. They’re also (if you find the right one) a really pretty addition to your bicycle cockpit.
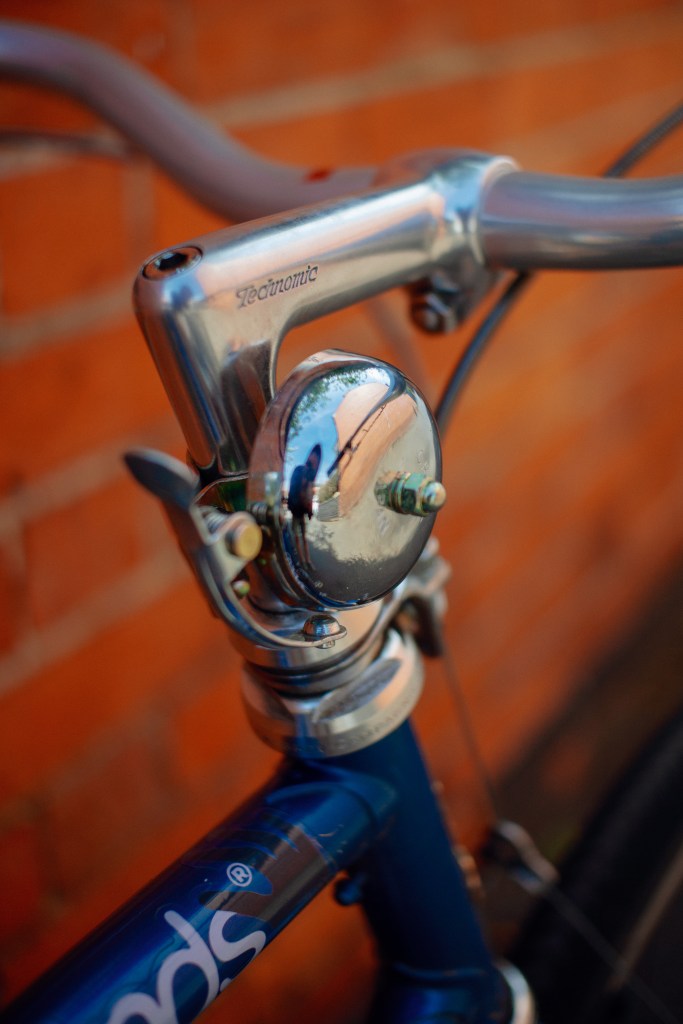
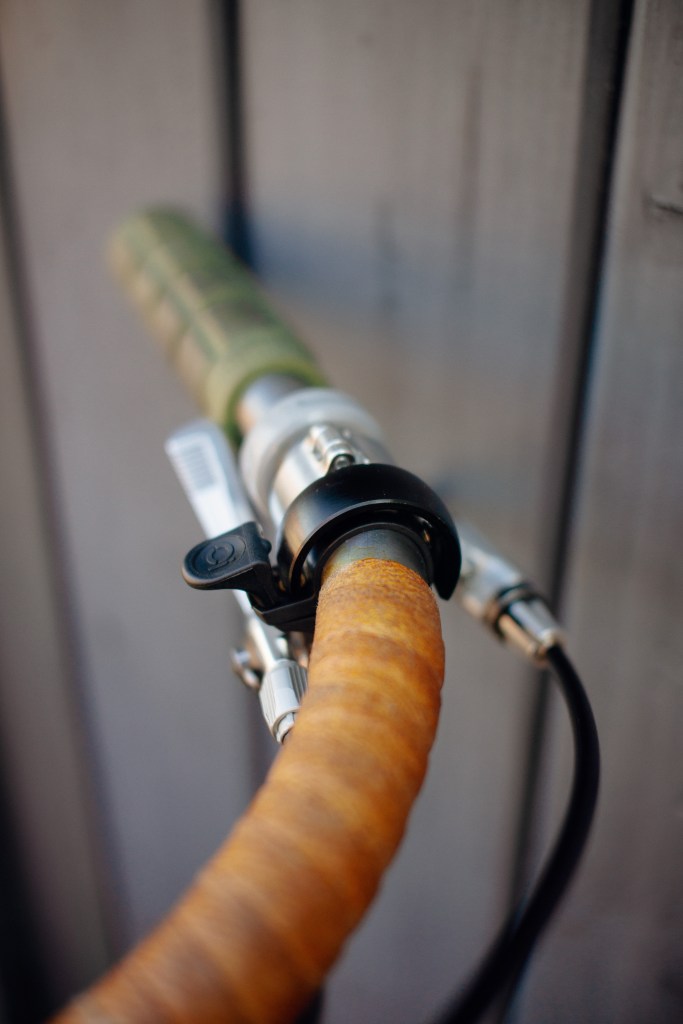
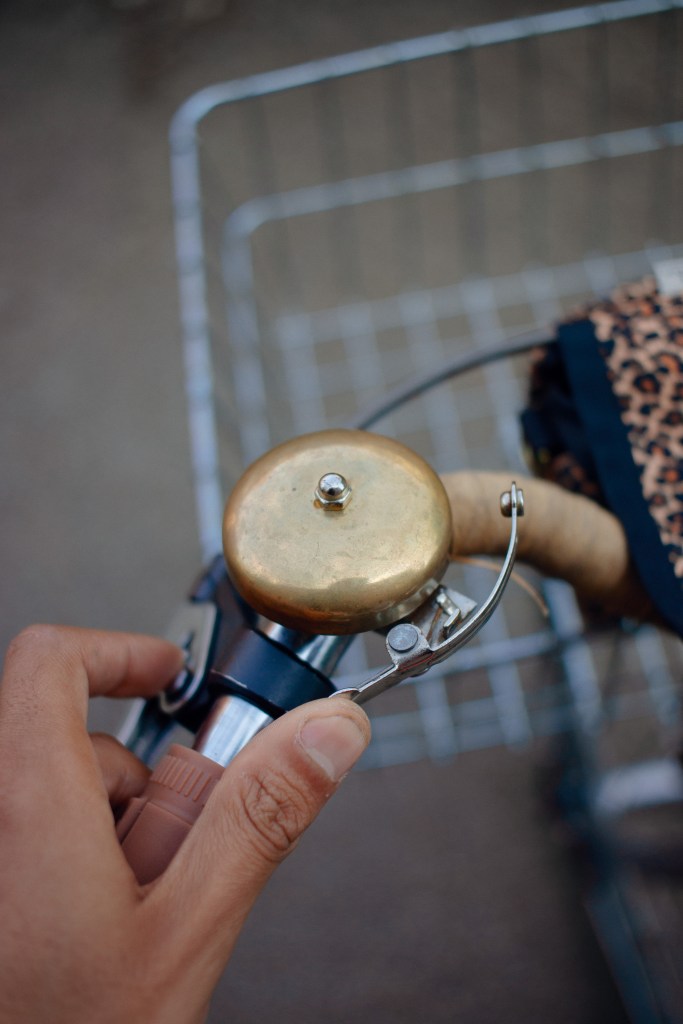
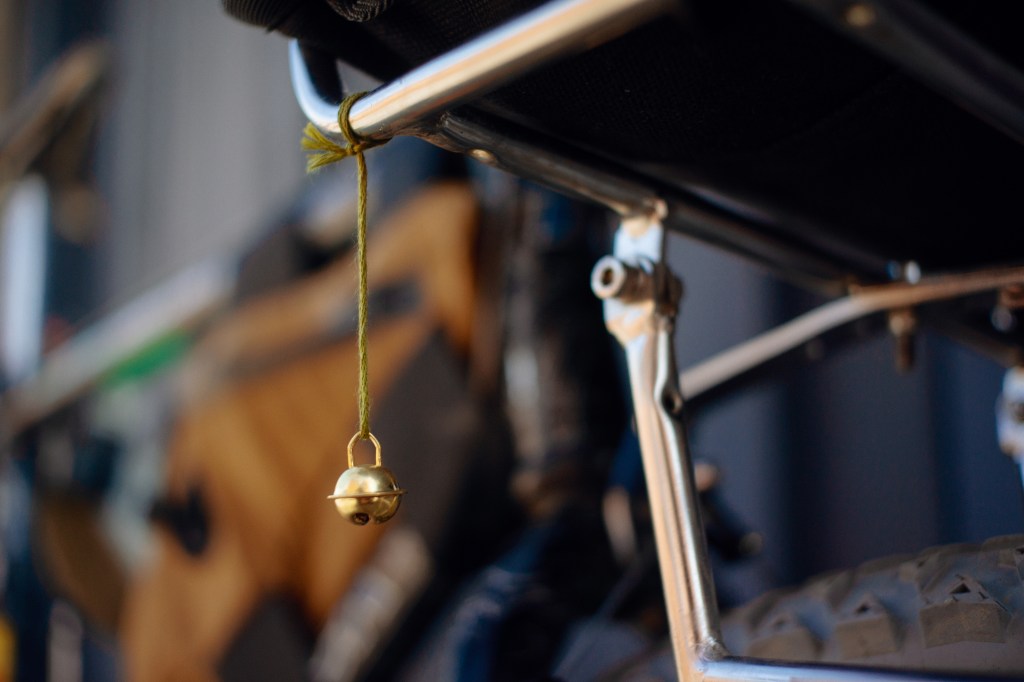
I’ve mounted my Crane Bell a lá Français; which basically means – it’s on the stem, not the bars. It just matches ok, you won’t get it mum. Not all bells have to be Trad® though, you can get these nifty, covert style Knog ones that’ll blend in with your grips which are cool. You can even put an actual real-life bell on too. I’ve loaded a little extra-one (I pinched off a Lindt Chocolate bunny) underneath my front rack so it’s tinkling as I go along (my actual bell is super loud and makes people jump a lot of the time lol).
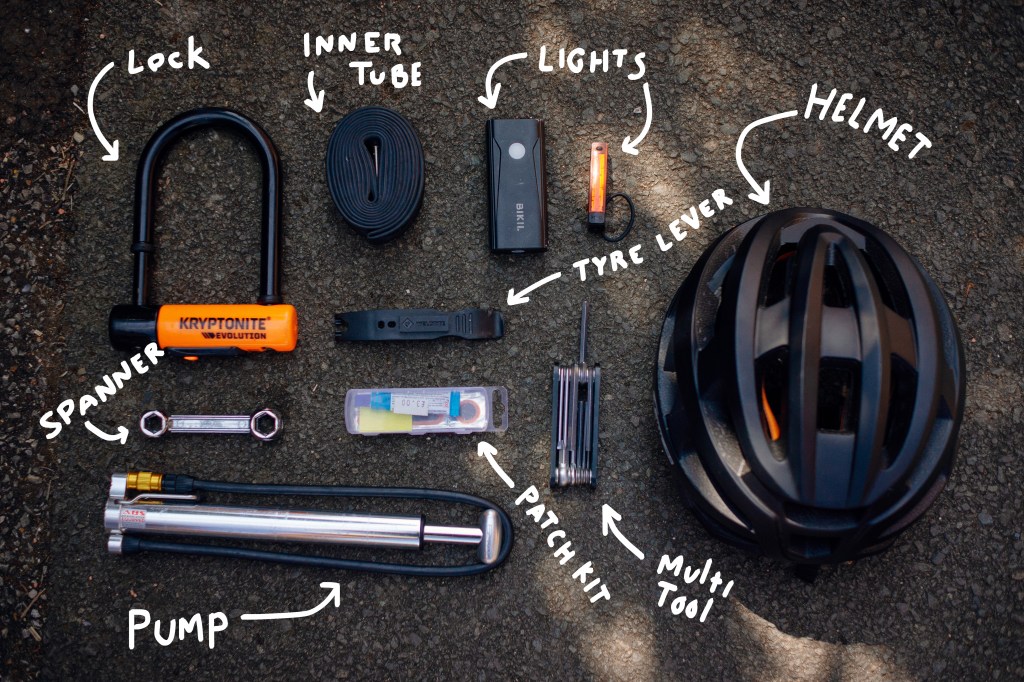
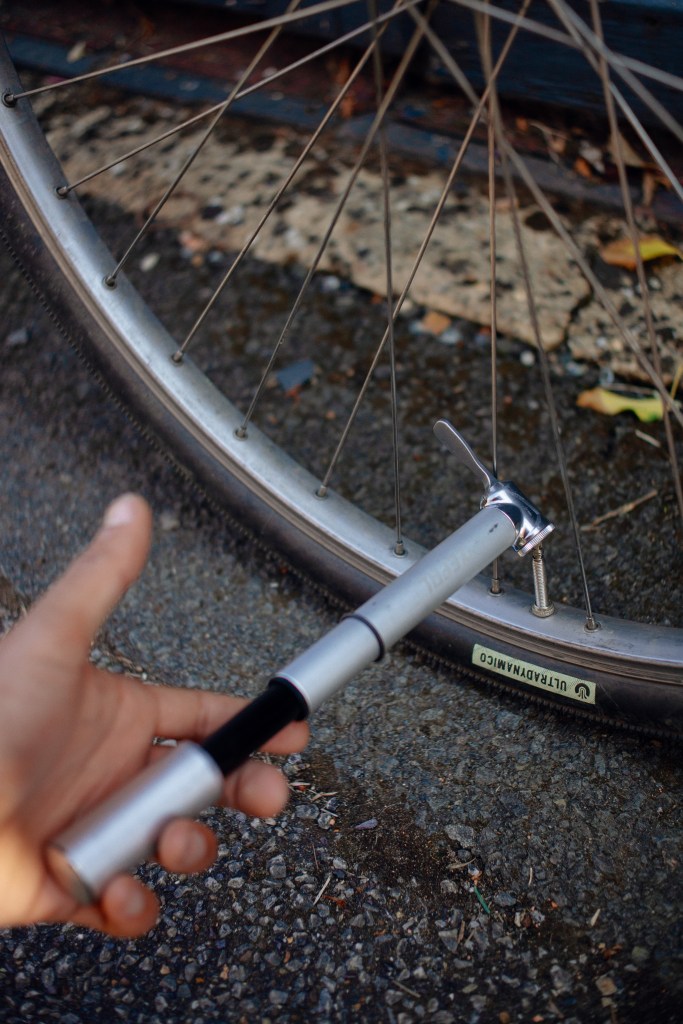
Pump
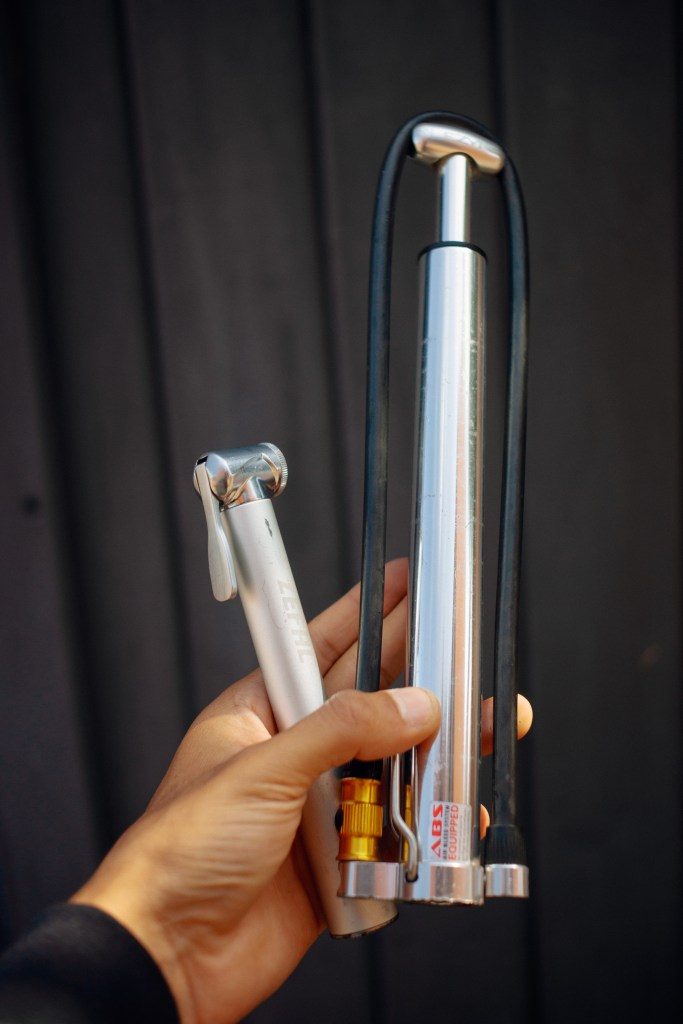
What do humans and tyres have in common? If your answer is rubbery and covered in shit on the outside but hollow, dark and with a faint odour of fish on the inside – You’re wrong. The correct answer is – we both need air to survive. Pumps put the air back where it needs to be. I’ve heard stories of people literally blowing inner tubes up with their mouths like they’re a sad balloon or something. Get a pump.
They come in all shapes and sizes, and like most things mentioned here, they have different applications. Floor pumps, frame pumps, mini pumps, electric pumps – where do you start? Considering this is the essentials, get a pump that can fit either on your bike or in-a-bag on your bike. mini-pumps are great on space but you’ll spend about 20 minutes per wheel if you’re starting from a flat. The bigger pumps do the job in half the time but obviously take up double the space. Do the math people.
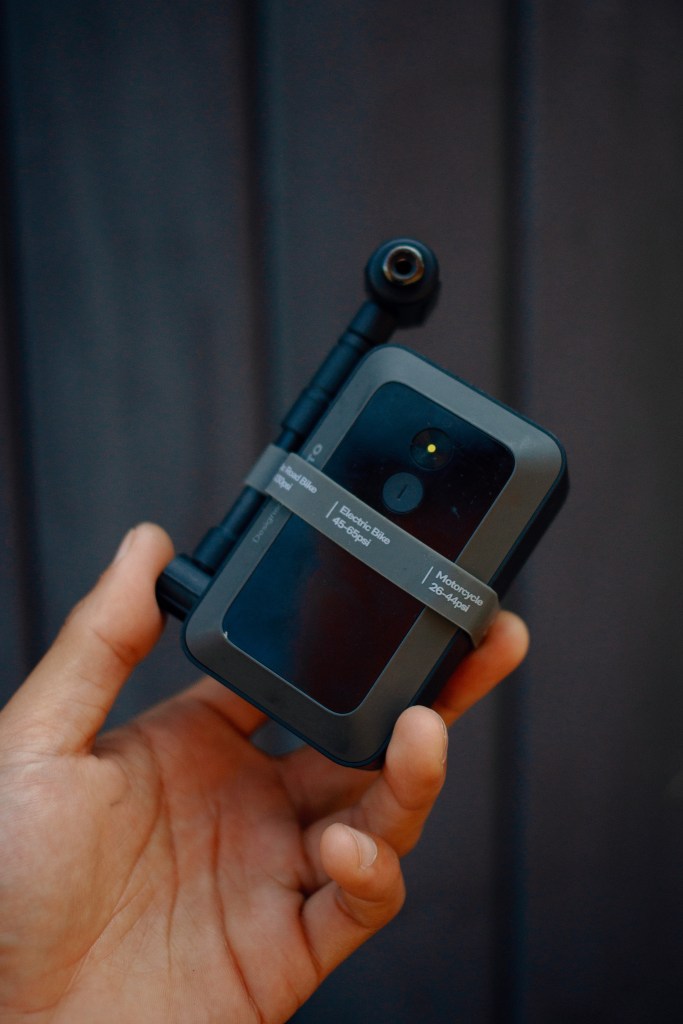
The obvious answer would then be an electric pump, right? it’s true – they are great (I do own one from hoto but for home use). But, they’re bloody expensive first off. Secondly, they can be kinda bulky and you’ll normally end up having to pay more to downsize that bulkiness. And finally, (the worst thing) can you imagine how you’ll feel when you go to pump up your flat tubes, 5 miles from home, and realising your battery is flat? Me neither man.
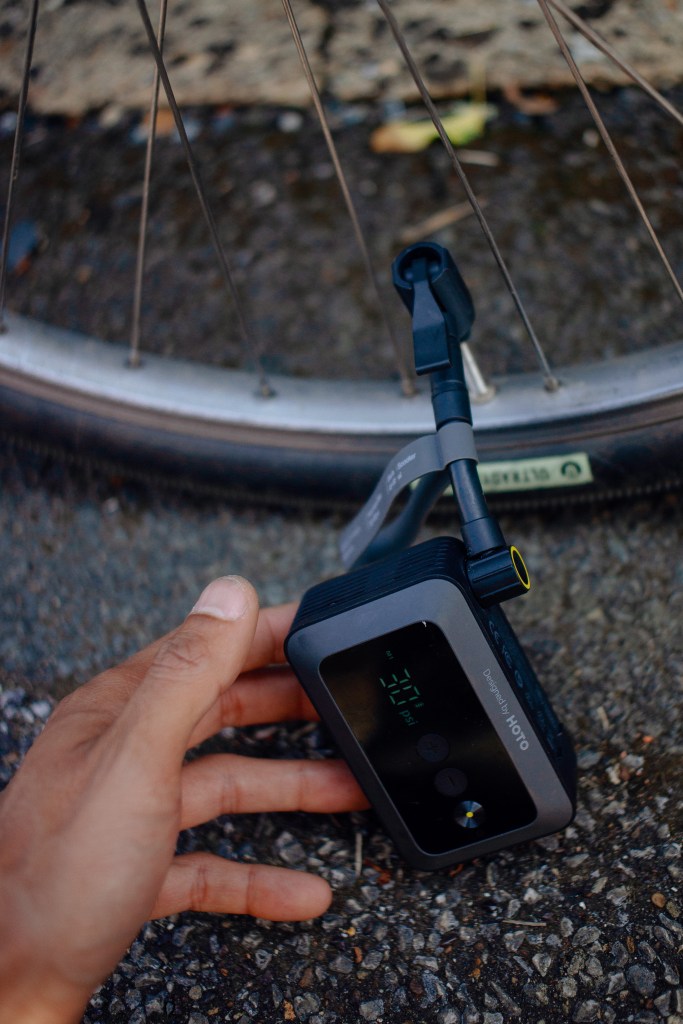
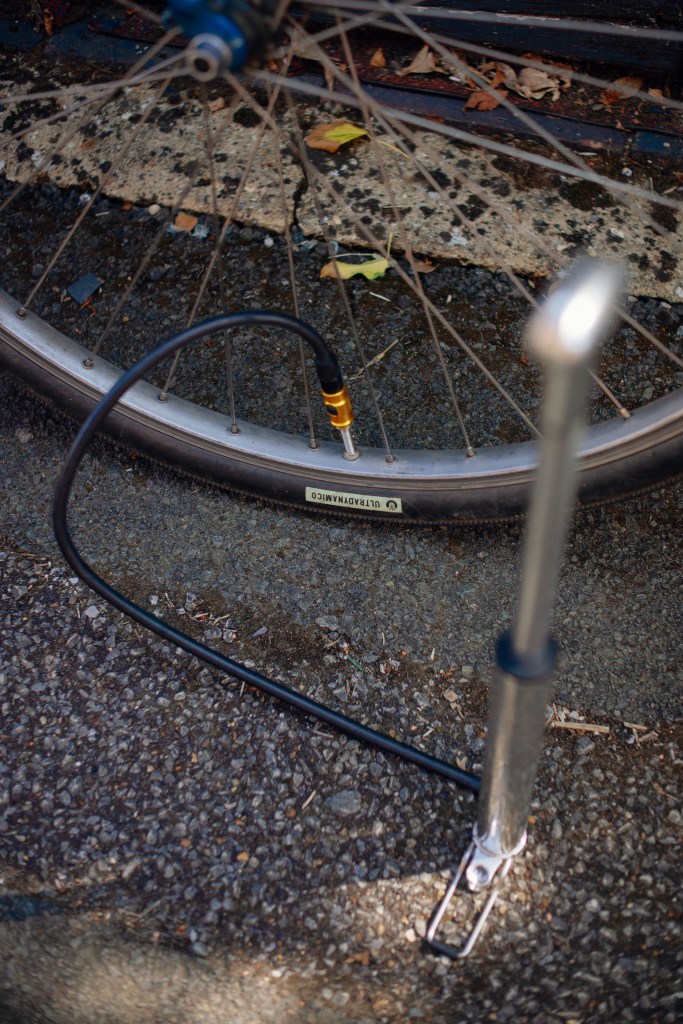
It’s worth mentioning that you’ll need a pump that’ll fit onto the valves your inner tubes too (either Presta – the skinny one with the weird spinning end bit, or Schrader – The fat end with the little pin that lets air out when you press it, the same you’ll find on a car) but that’ll lead us perfectly to the next section.
Tubes, Tyre levers & Patch Kits
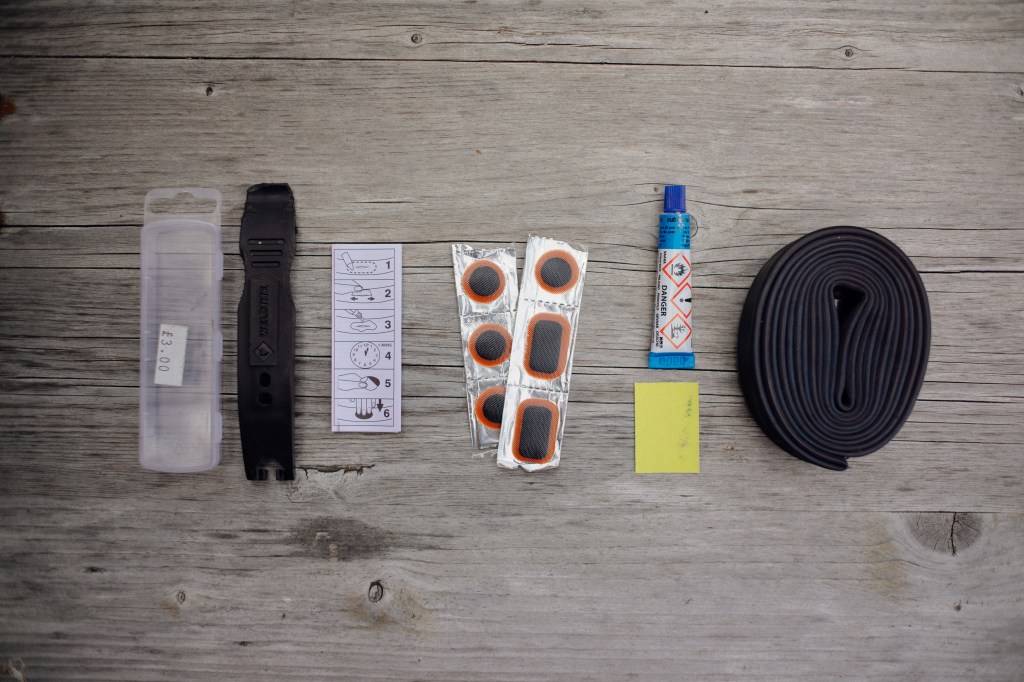
Spare tubes and/or a patch kit should be kept pon de bike at all times. Trust me, I’ve tried electrical tape, gaffer tape, super glue, a sliver of another inner tube layered over the top. I’ve even heard stories of people using leaves and grass. If it does work, it won’t be for long enough and definitely not far enough. Getting flats is a part of life and it’ll humble the best of us so tube up baby. Some people get pretty techy and run ‘tubeless’ tyres which basically means they have liquid latex sloshing about inside their tyres and not a bladder full air. Again, big argument on what’s better but that’s not what we’re here for.
For First Timer© Crüe, stick with a spare tube. If you feel a bit more confident and environmentally conscious, get a patch kit. The last couple times I bought these from a ‘Non-descript’ retailer, the kid serving me looked at me like I was a dinosaur. Believe it or not, they do actually work and I personally prefer them to tubes because – they’re less wasteful to begin with (where does all the rubber go?) and they’re actually kinda fun to do. If I’m going on a big ride, I’ll always carry a patch kit and a tube just in case. Lastly, a good tyre lever. Getting your tyres off is actually the most difficult part in some cases, so you want something that’s got good leverage and also not going to put a hole in your opposing hand.
Important to get tubes that fit too, if you’re unsure what size you have, it’s normally written on the side wall casing of the tyre, above the edges of the rim. It’s format will either be something like 26 x 1.25 or 700 x 28. The first numbers (26 for Mountain bikes, 700 for road/commuters) will be the diameter of the wheel, the second number will be the width of the tyre. Your tubes should correspond, so no putting 26″ tubes in a 700c tyre basically.
Multi-tool
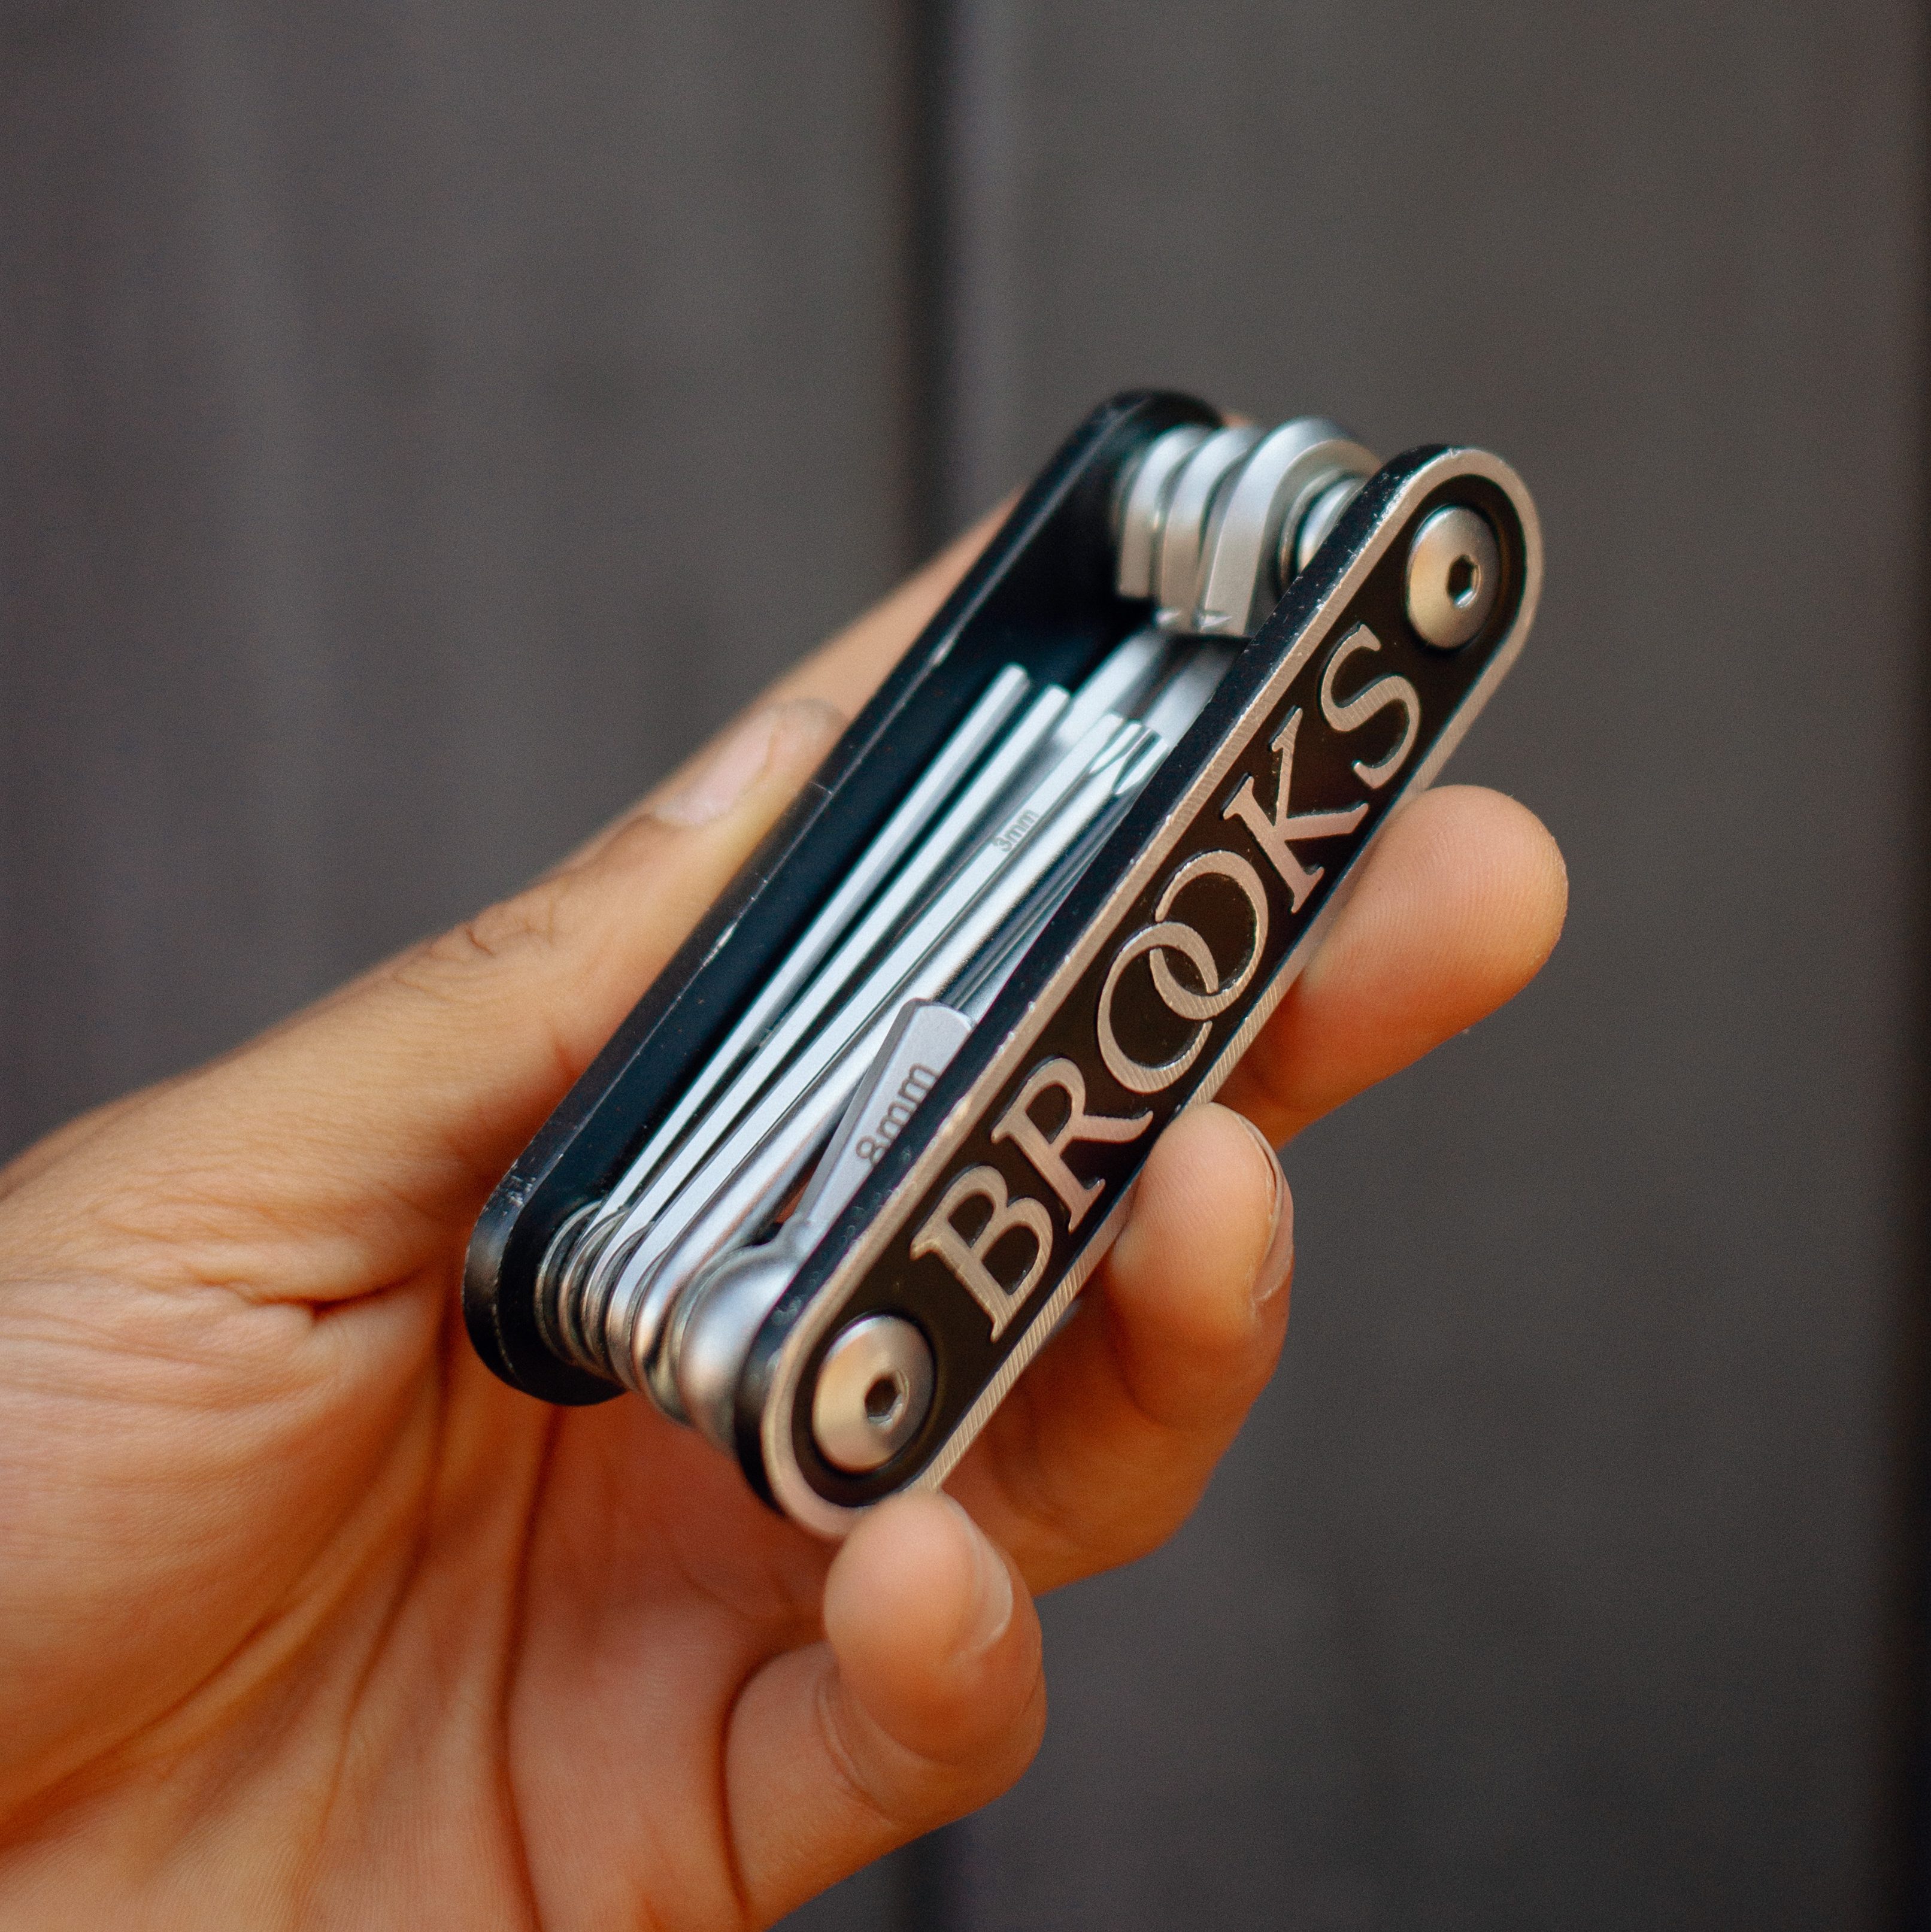
Rattling bolts? wonky handlebars? squishy brakes? You never know what’s gonna come loose next eh. You thought you’d done those rack bolts up tight huh? That Redway® that hasn’t been repaved since 1982 thinks otherwise. “A person is only as good as their tools” or something-or-rather I think it goes. Invaluable and like most things in this category, essential to have in your arsenal. A lot of variety out there too depending on how you swing. A humble array of Allen keys and Phillips/Flat heads is a good minimum base to start off from.
You can get even techy-er ones that have all sorts of do-hickys and gizmos like pliers, adjustable wrenches, Dyna-plugs and the rest. Importantly, you want to keep it streamlined: hopefully we’re not going to be taking bottom brackets (you don’t even know what that is do ya eh? we got a long way to go I guess x) at the side of the road. We’re talking just the right amount of metallic instrumentation to put that seat post up a bit higher, or adjust the alignment of your brake pads so they stop squeaking. Multi-tools can set you back from £15 to £100+ depending on the tech innovation included, so play it smart, think how serious you wanna get, and stay strapped.
Helmet
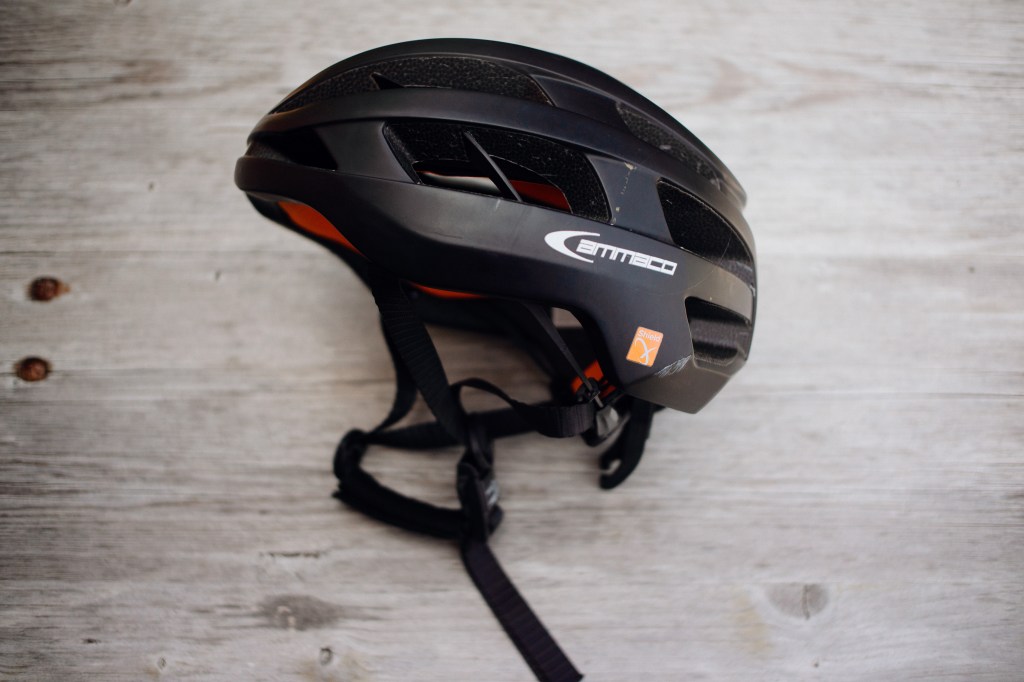
Ok so let’s be honest here. I know Hands® is ‘cool’ and all that, right. And, I know I am personally not setting a good example – But, in all seriousness: I don’t have a single excuse to why I don’t wear a helmet. Of course I could hit you with the ‘I used to skate blah blah’ bollocks but ultimately, nothing is protecting my bonce from cold, hard tarmac – no matter how much hair I try and cram under my cap/beanie.
When my gf started riding a couple months back, it was one of her complete and utter non-negotiables. She had to wear a helmet or she was not riding. I respect it, I rate it and I fully endorse it. It’s the smartest thing to own and wear, without going into the benefits of it. The times of looking like a Dork® are behind us, and that’s exactly where they should be. Who gives a shit what you look like with it on? It’s there to save your life and prevent you from brain damage. It’s worth putting some funds into a decent one too. Yes – anything is better than nothing, but you also want to ensure you tick the Comfort and Function boxes – they even make ones that have lights or rain covers built into them now.
Lock
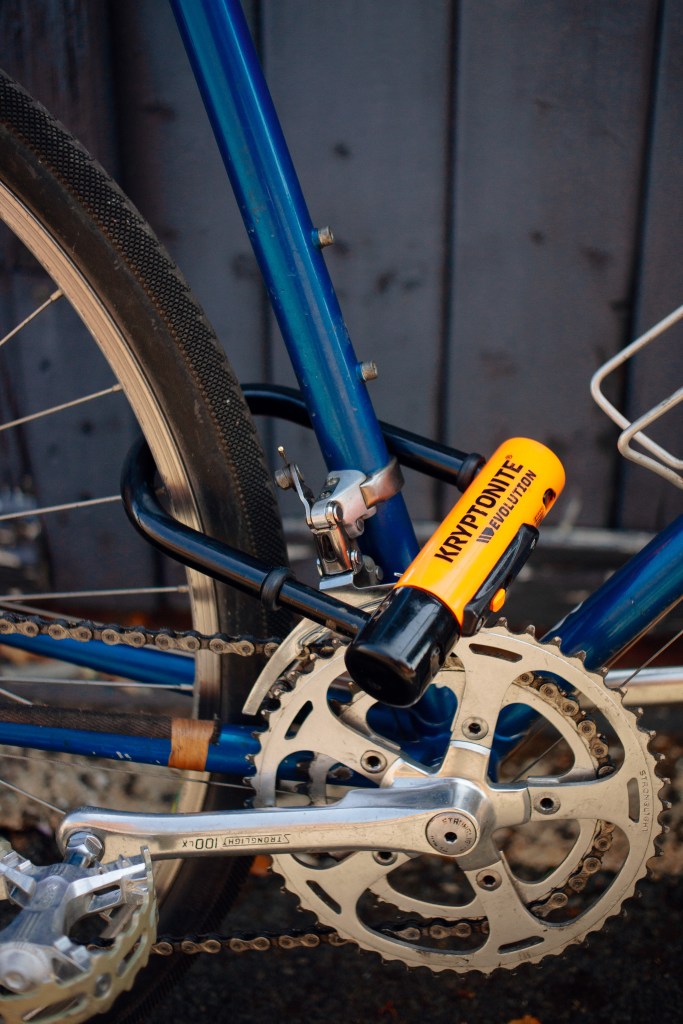
Finally, closing off and securing our Binary Code section safely; The dumbest and bulkiest, most cumbersome item on the list: The Lock.
I won’t lie, I actually hate locks. They’re heavy, they make this annoying fucking rattle when you’ve got ’em on your bike. They look dumb af when they’re hung from handlebars and most of the time (we’ve all seen the videos of the Bally Boys® angle-grinding that Electro-Trek in a city centre somewhere) they don’t even stop your bike getting robbed. But before I place my legal status in Jeopardy (all the above opinions are my own lol) they’re a good thing to carry *when* you need them.
I went to a conference a couple weeks back and stuck true to my anti-lock guns. The staff at the venue kindly let me leave my bike in a lock up while I was watching a speaker. I spent about 26 minutes with my heart rate over 180, caused by the crippling anxiety that it was in a fenced-off public area, with no lock. It was not worth the stress, at all. Locks, do not guarantee that your bike is safe. It’s a deterrent, and even then – if your bike looks nice, they’ll go for it anyway. I know friends of mine that have the Hiplock D1000 which is angle-grinder proof and the rest, but they’re like £300 – and they’re locking up e-powered cargo bikes etc so it actually makes sense.
Like I said, they are worth having. I personally use a small Kryptonite D-lock which does the job when I need it, mainly because my bikes have been worth less than the lock itself in most cases. But like all of these things, do the math. Don’t go for the cheapest on the list, don’t also end up on the opposite end of the spectrum (unless you need it) – just remember, you gotta carry that shit with you somehow.
Hardware
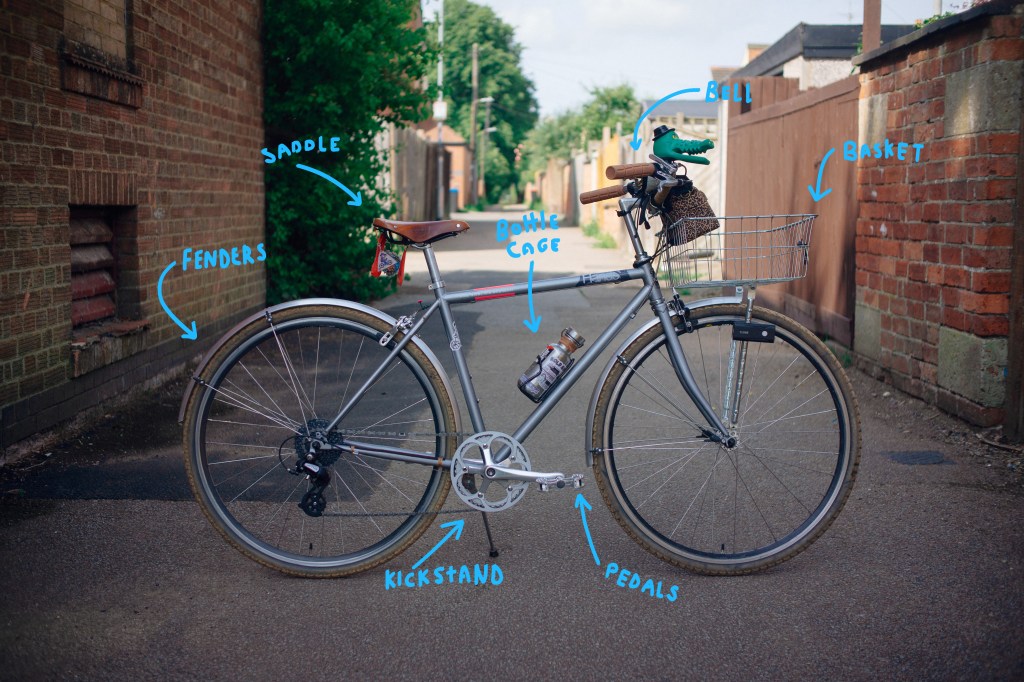
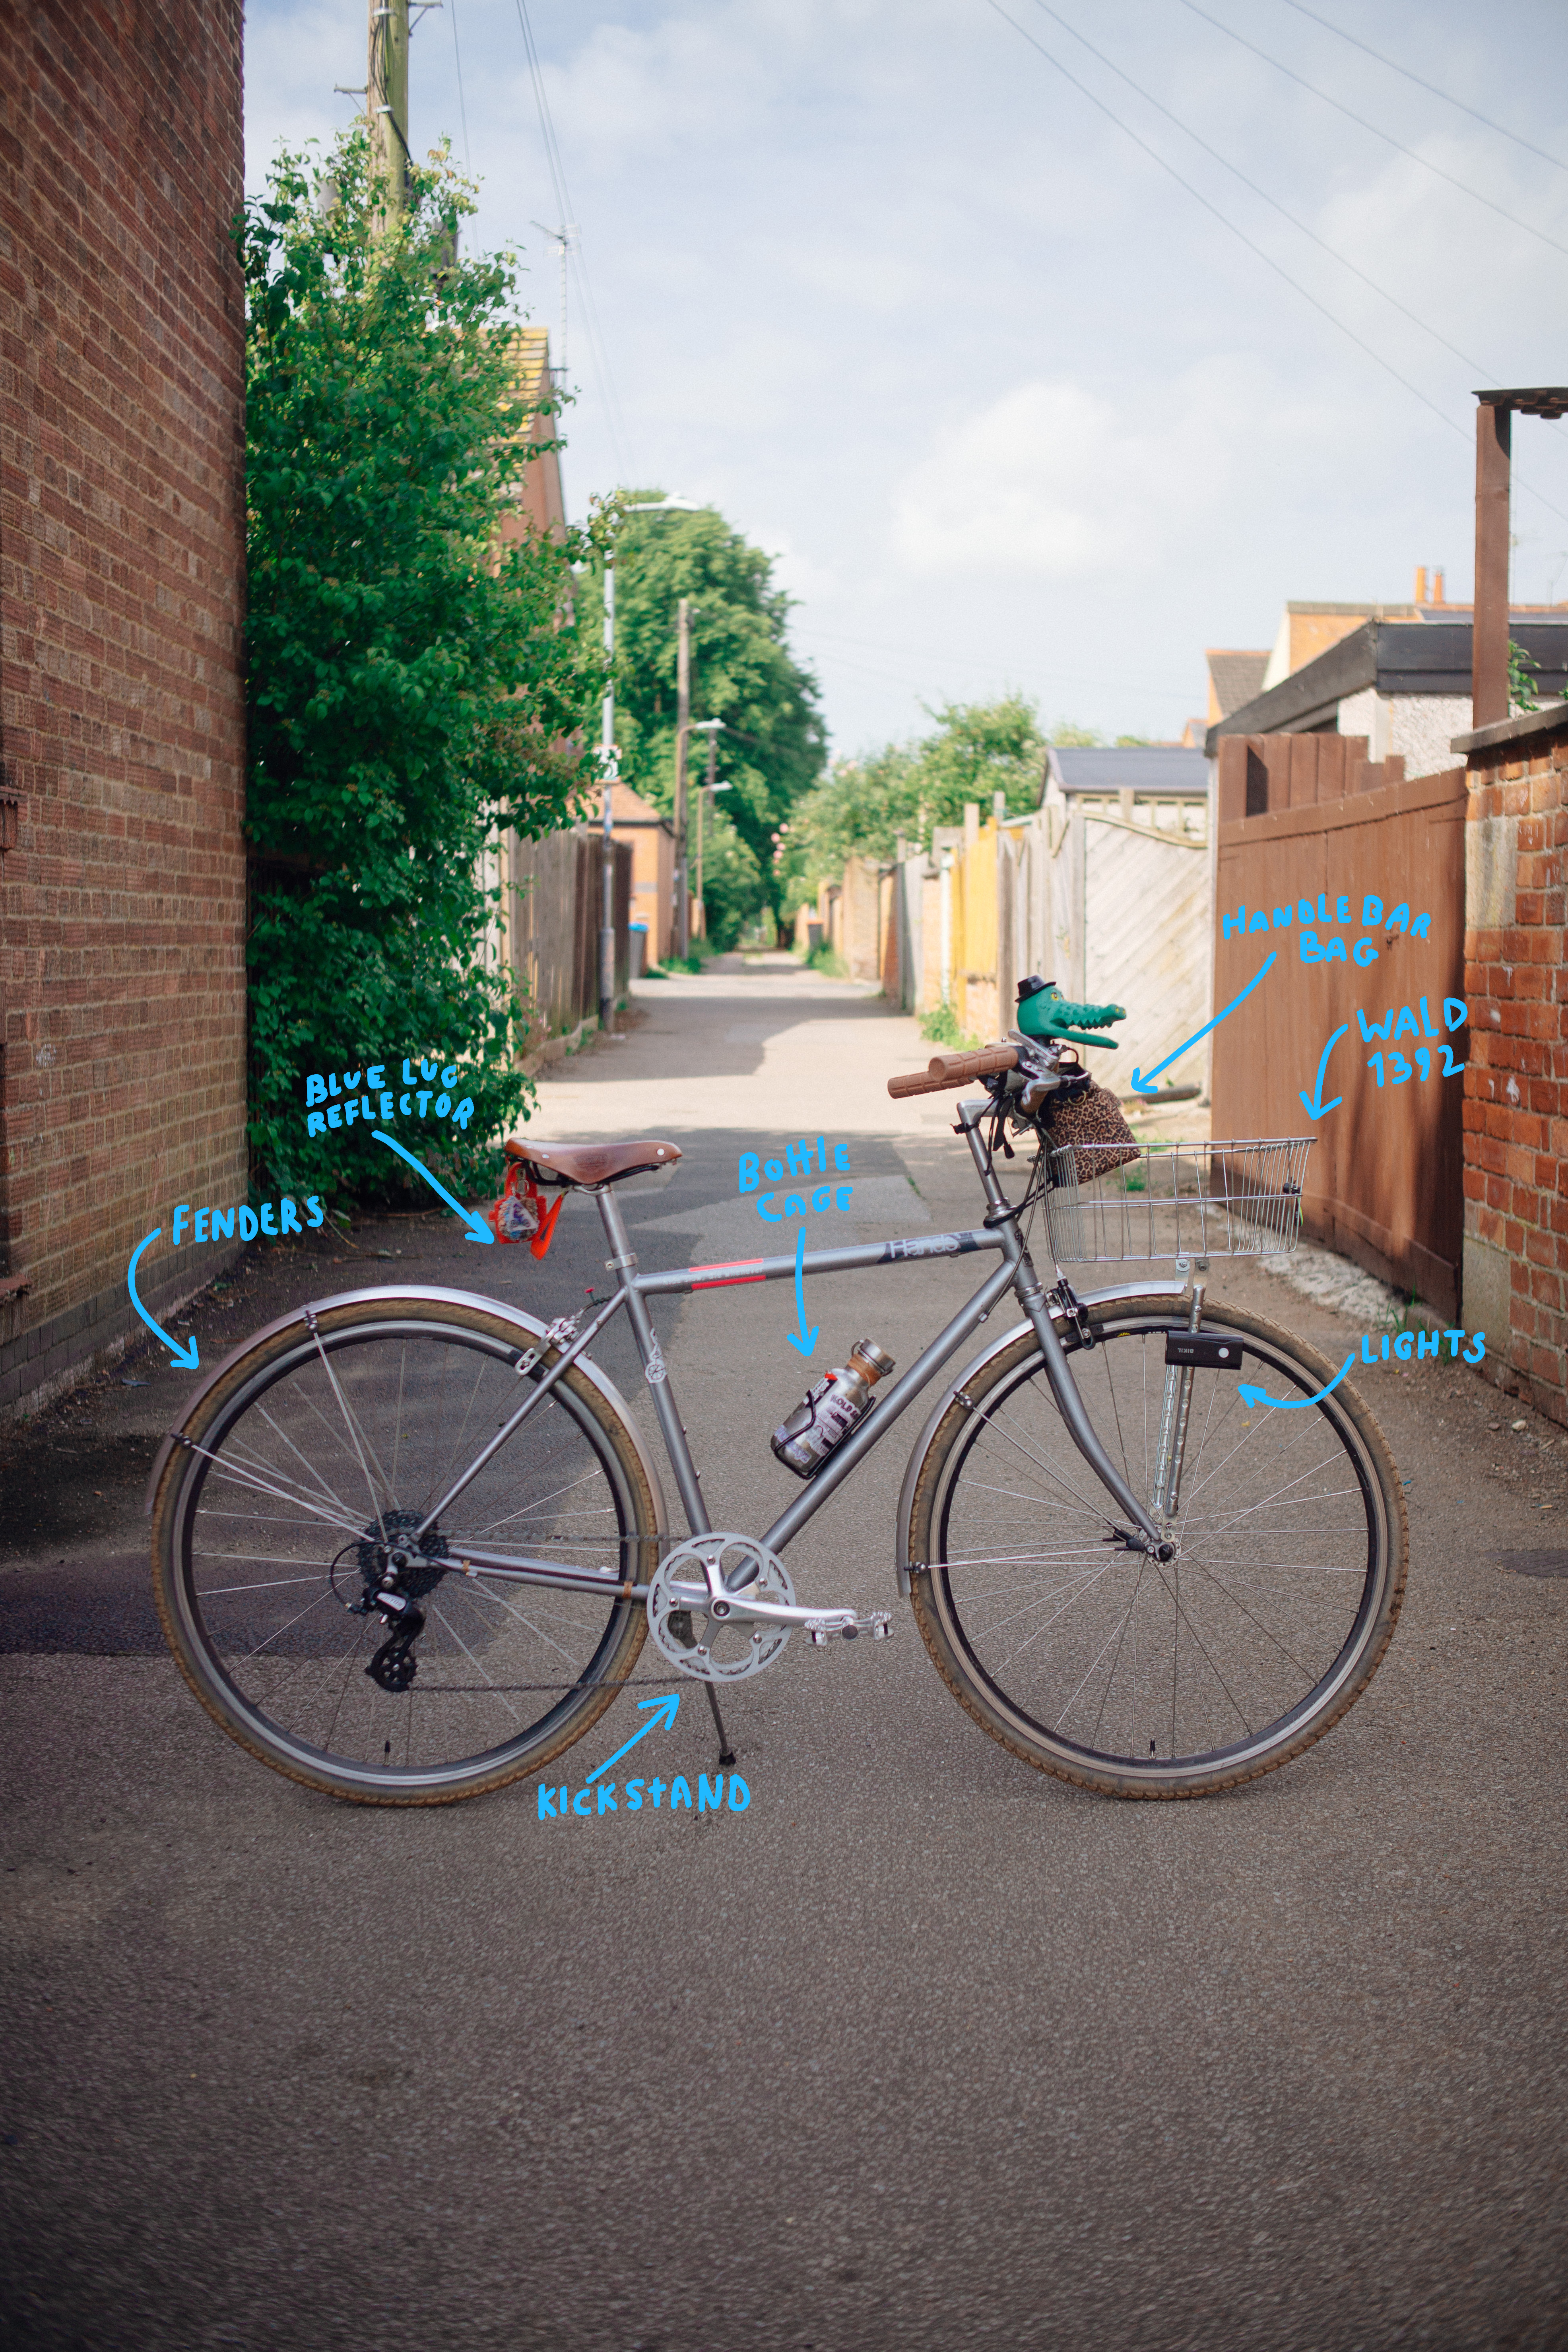
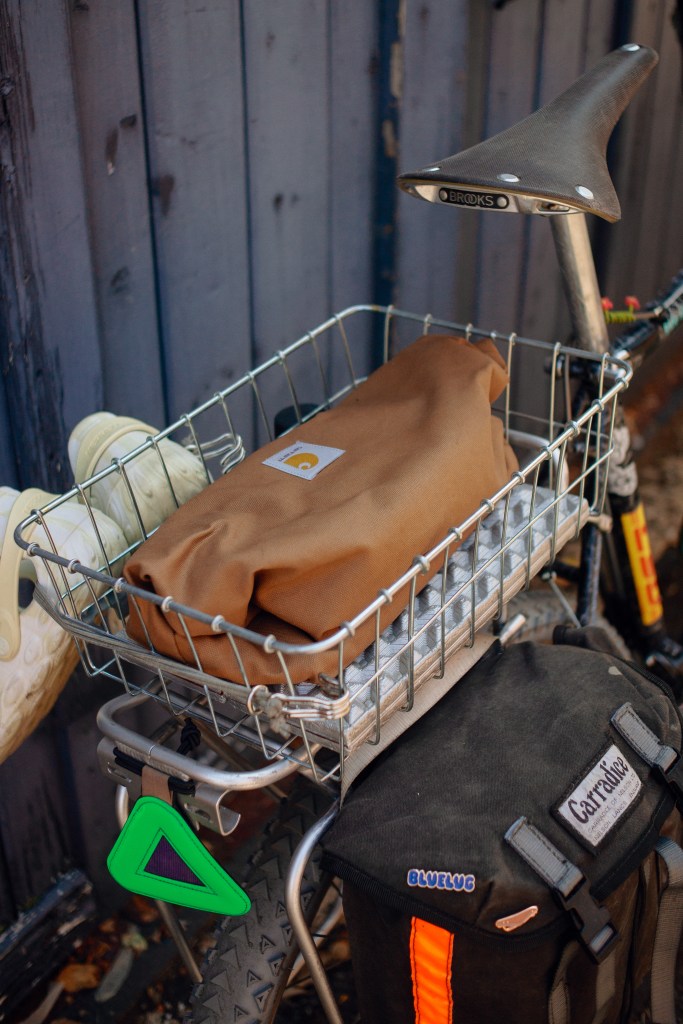
Baskets & Racks
Now we’re getting to the fun stuff. Baskets and racks really take your bicycle’s functional utility score to the moon. Once you use a rack, you never go back amirite. The formats are:
- Front racks: Usually used to support large handlebar bags or as a base to mount baskets and boxes from.
- Rear racks: Normally used to attach Panniers (those rucksack looking things that hang either side of the rear wheel) but also useful to mount extras, like baskets and boxes again, on the flat surface on top.
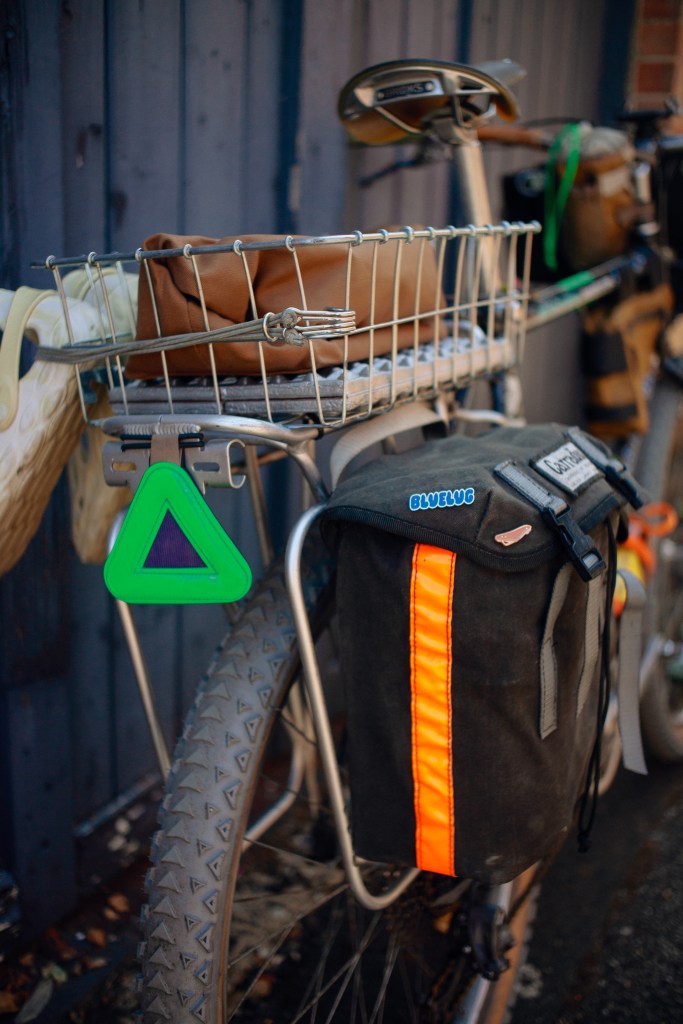
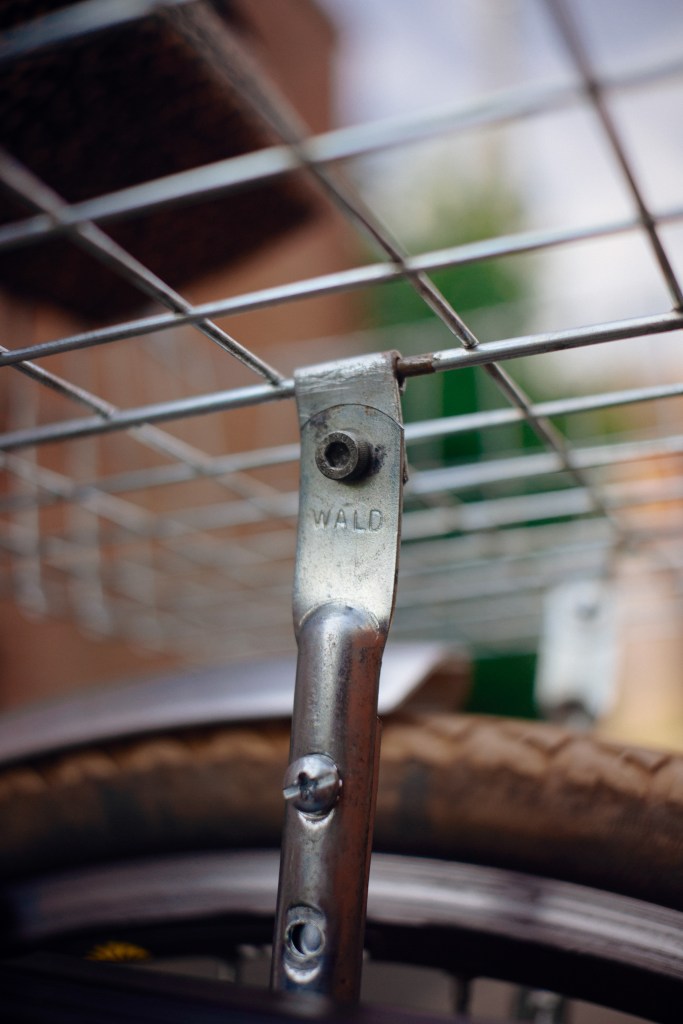
Imagine these aluminium climbing frames as literally that: If you can strap it on safely, it works. There’s this wicked instagram called ‘Carry Shit Olympics’ that shows how far the boundaries of Carrying Shit™ can go. My go-to combo of rack x basket at the moment is a ‘porteur’ rack (means ‘carrier’ in fancy French) which is normally standard across brands, and a Wald 137 Basket that I’ve cable-tied to the rack. Wald is the name of the manufacturer (still made in the U.S.A since 1905, wild) and the ‘137’ is the size/model. I got the 137 as it fits a 13″ laptop in a tote bag perfectly. I also have a Wald 139 which is double the size (imagine an A5 vs A4 sheet of paper) which is great for hauling even more Shit® but the way it mounts to the bike is interesting.
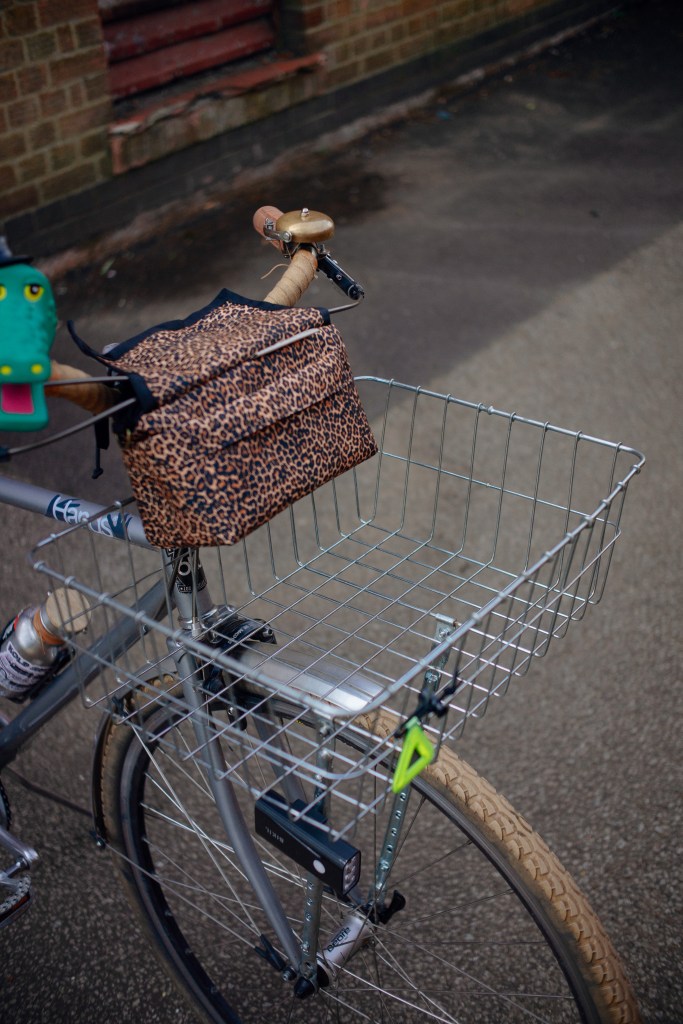
It comes with mounting points to the fork and handlebar already attached to the basket which is great if you’re sans-rack. For beginners, I’d definitely recommend using something like that if you fancy dipping a toe in basket land without the extra costs of getting a fancy French rack (which in most cases, are incredibly fiddly to mount on too).
Bottle Cages
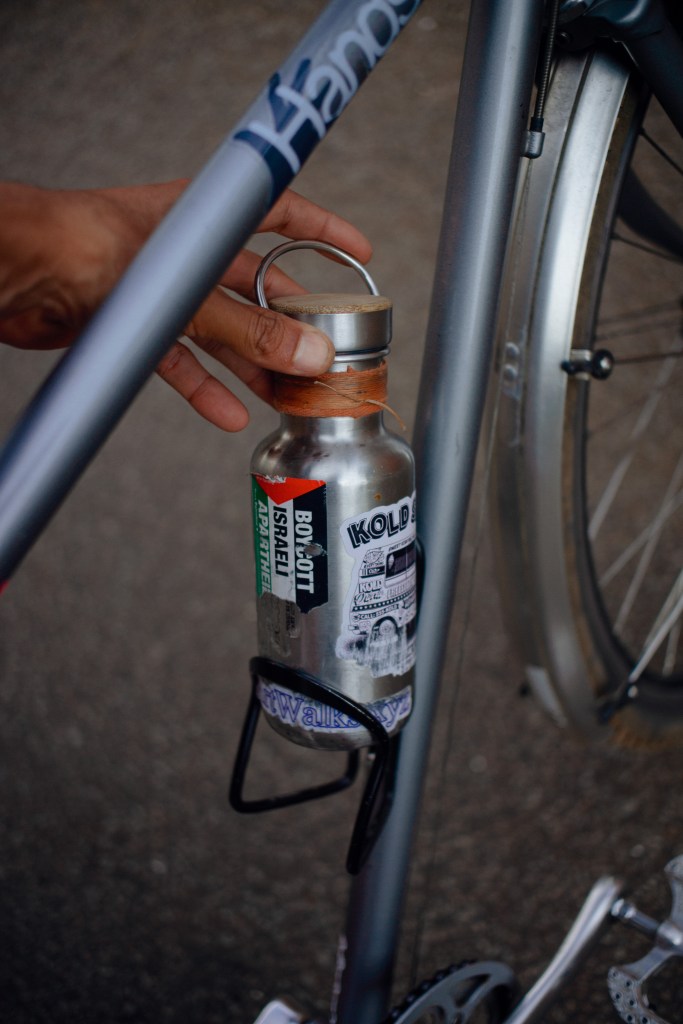
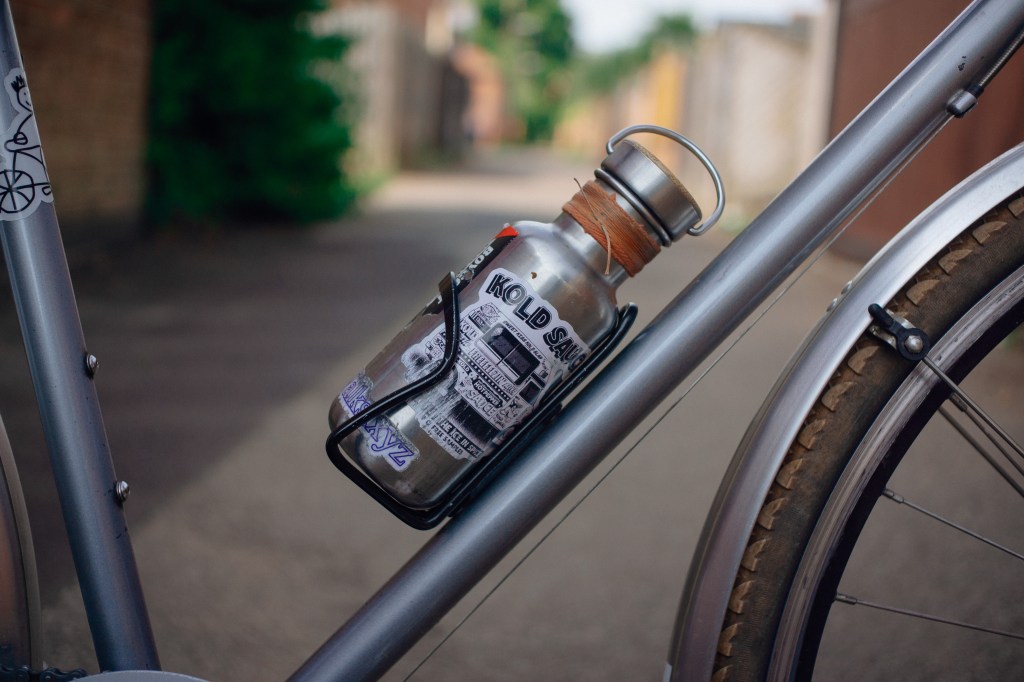
These little bits of (what commonly seem to be considered forgettable) metal, are the difference between you dying of thirst in the wilderness, or riding around with a beverage clutched between your fingers and brake levers. Neither of those options are enjoyable – a bottle cage will solve that. In most cases, they’re cheap – easily available from pretty much most bike shops and will do exactly what they say on the tin: hold your bottle on tight.
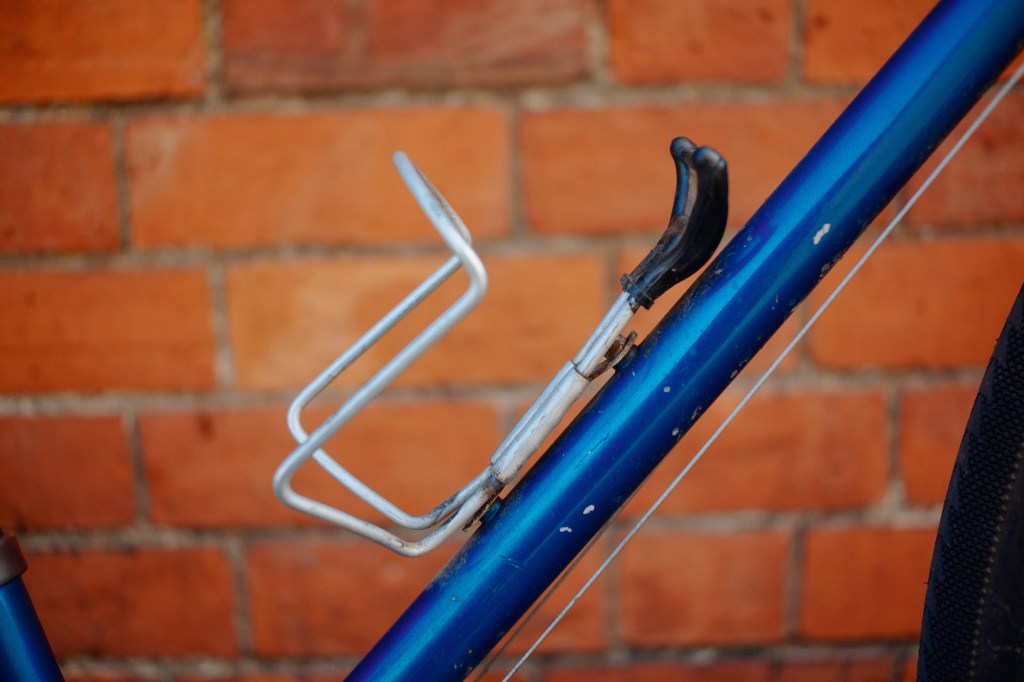
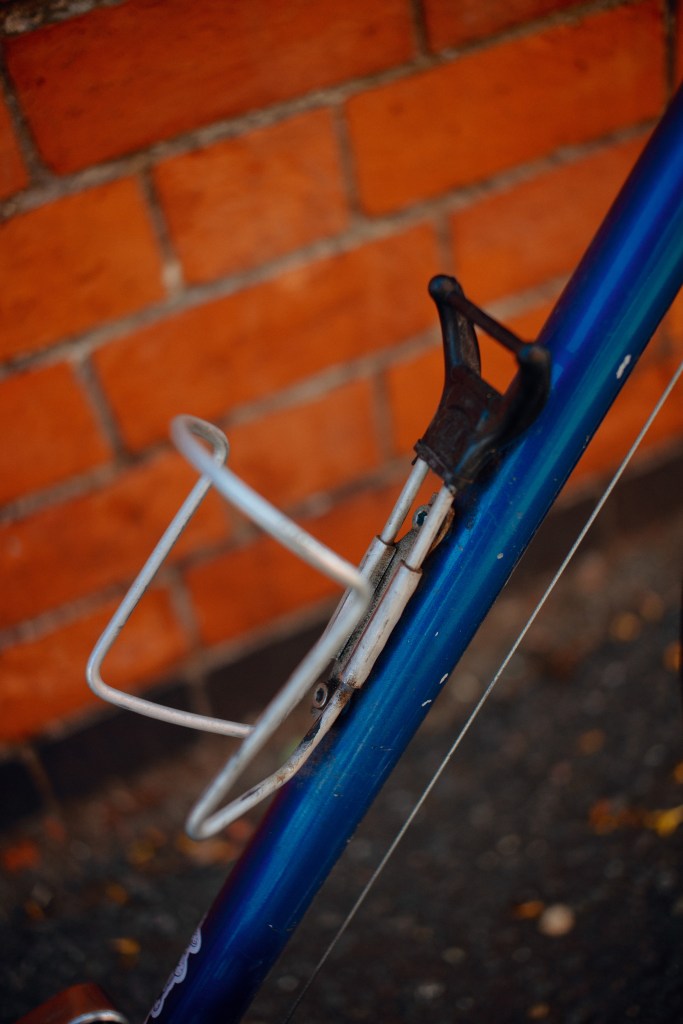
Aesthetically too, a bike without a bottle cage is incomplete. It’s even funnier when you see more modern bikes with mounting points (the little screw in bits for extras) covering the bike form front to back, without a single bottle holder. Mount it on the downtube (the diagonal bar that cuts down from your handle bars to your pedals) and you should, in most cases, be able to grab it while riding, drink, and pop it back. That’s the idea anyway – also bottle cap dependent. Bottle’s come in all shapes and sizes but most normal (think a regular Chilly’s bottle size) will fit in a regular bottle cage. It’s only when you size up to a Nalgene, Klean Kanteens and the big Stanley flasks that you’ll need to rethink your cage footprint.
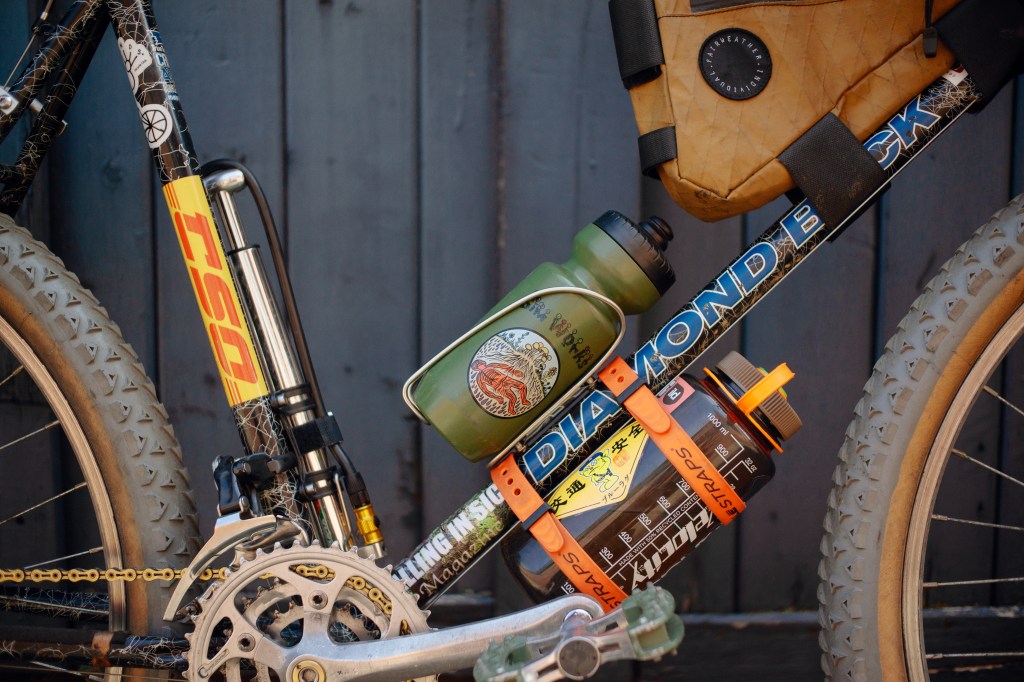
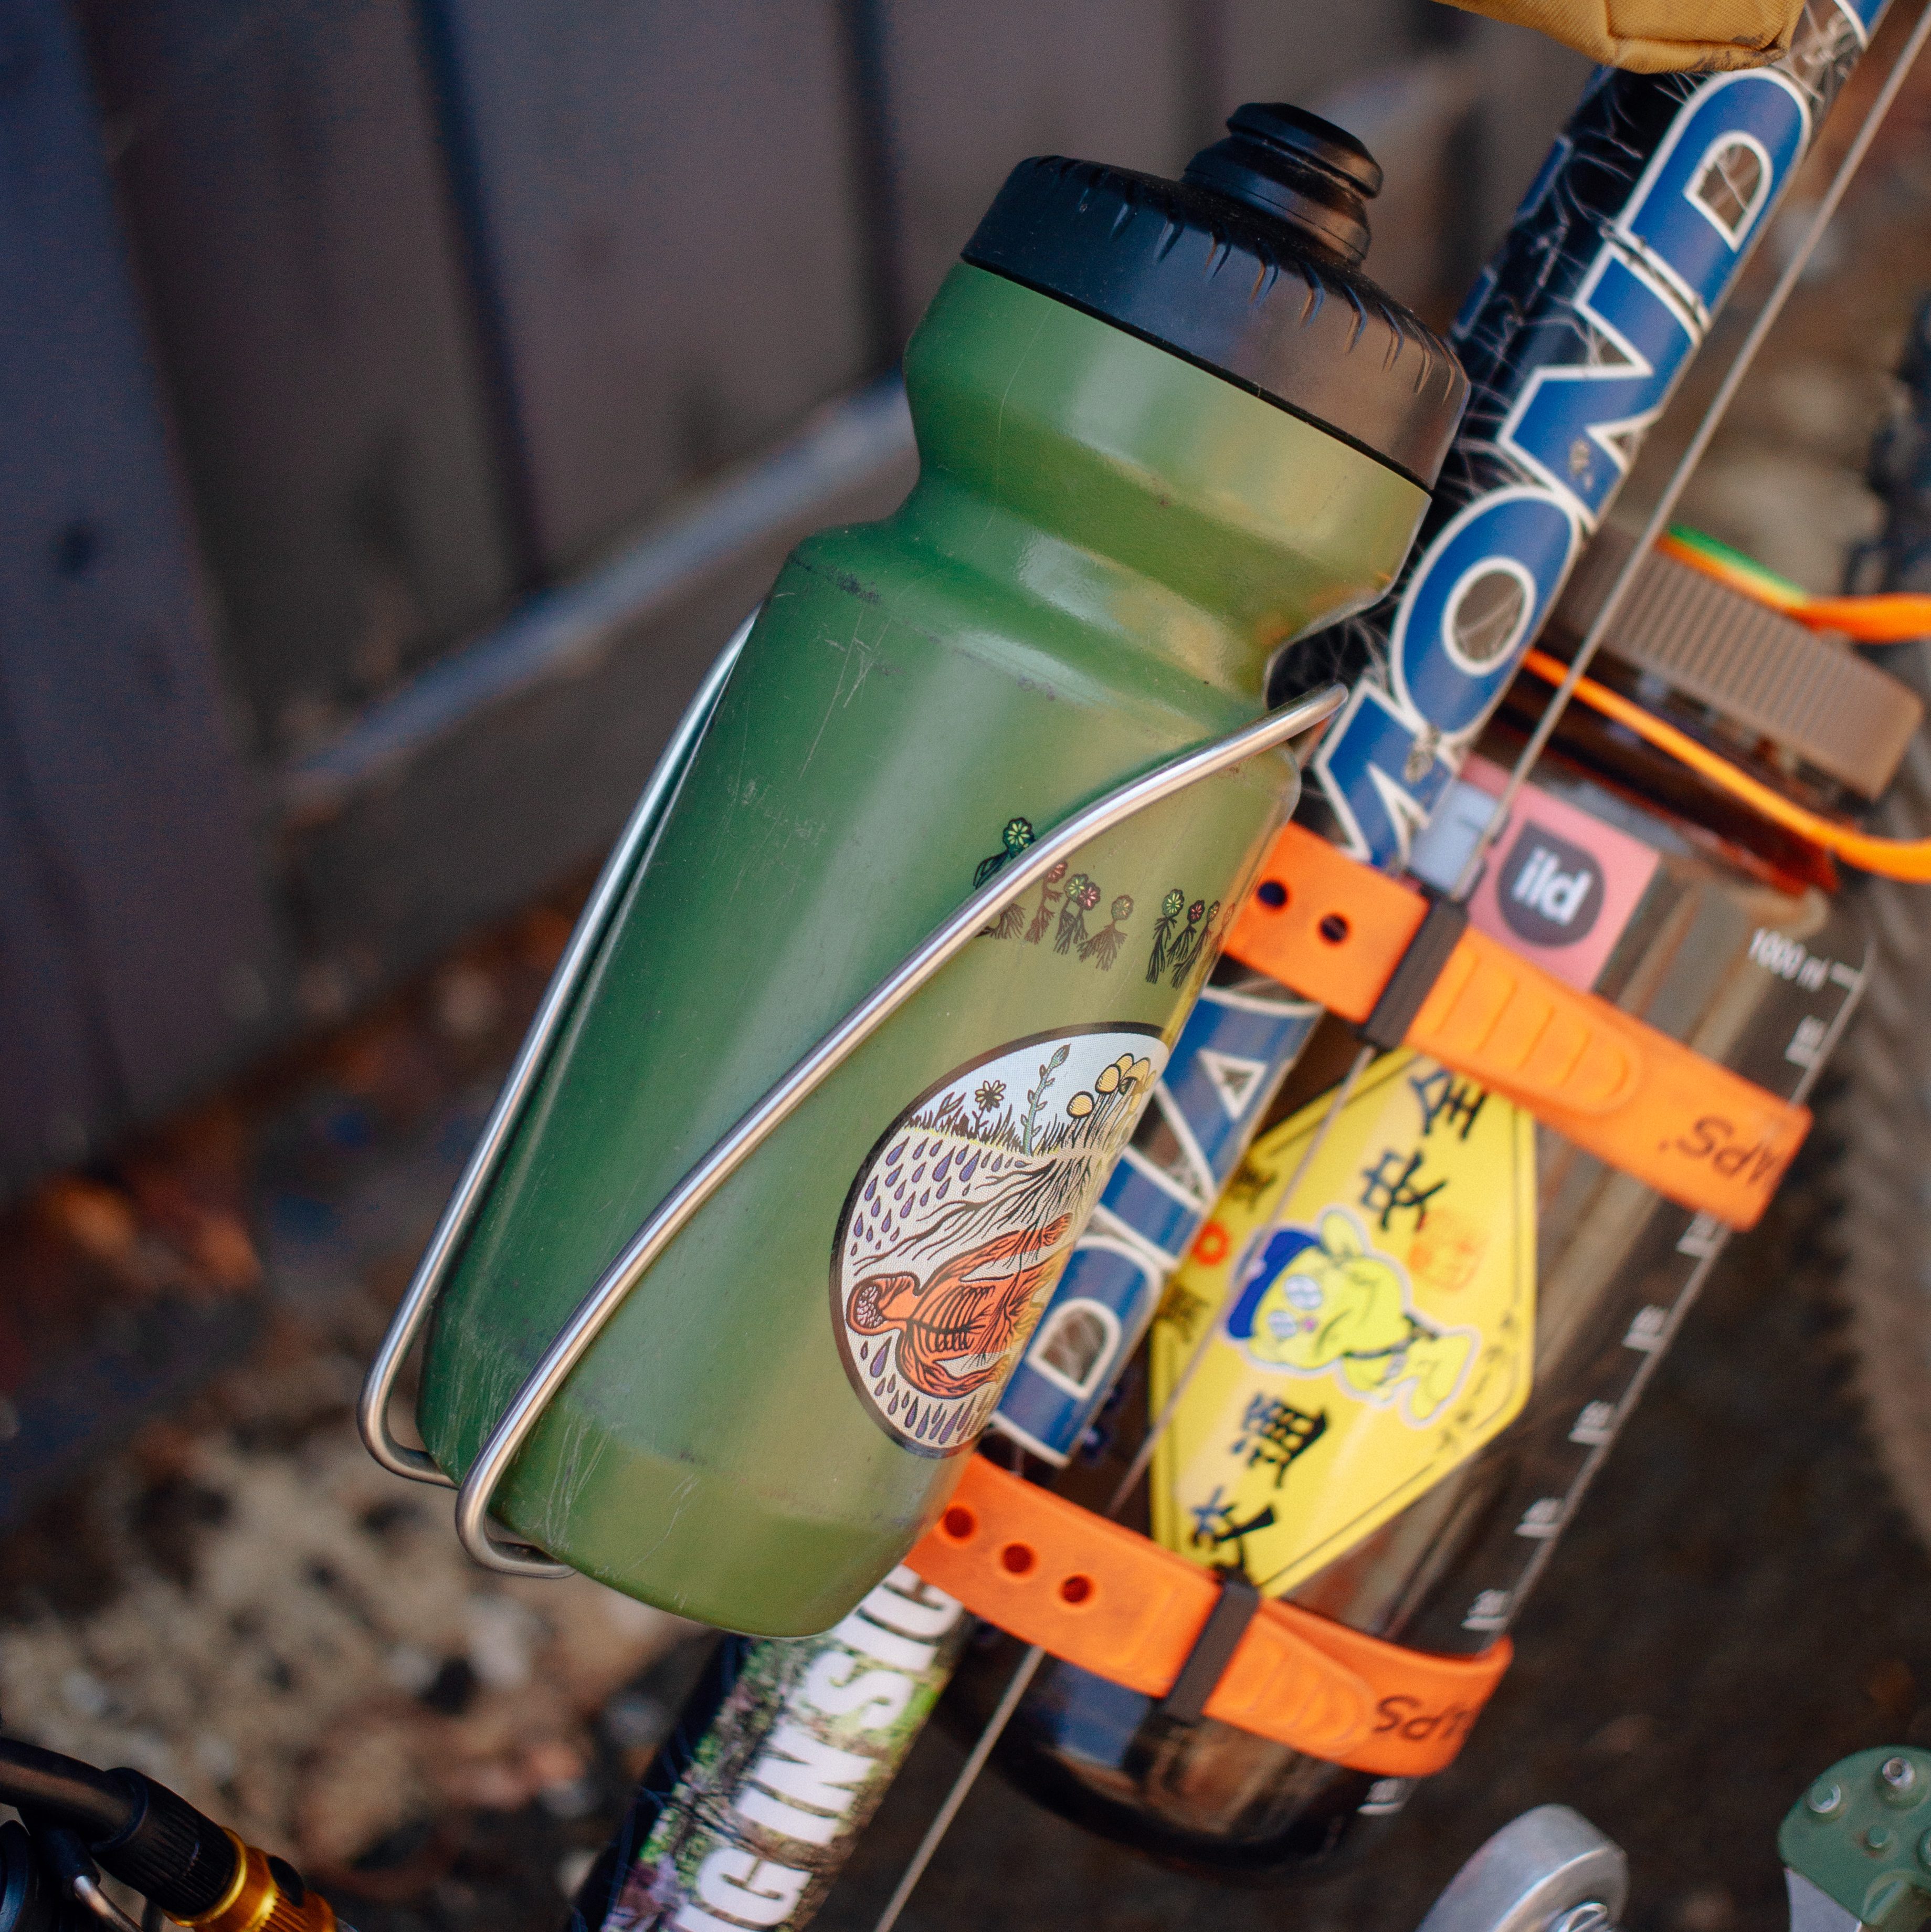
Companies like Velo Orange and King Cage do cages specifically made to fit these larger containers (as well as the small ones) That aren’t only practical, but beautifully made too. There’s also adjustable ones that have a rotating knob to tighten the cage to your desired diameter. These last selection of cages are great if you’re planning on riding longer, camping or coffee outside but maybe overkill if you’re just riding to the pub for a couple. For the more simple tasks, remember: K.I.S.S (Keep it simple stupid – for those who weren’t taught it at school). Stay hydrated.
Kickstand
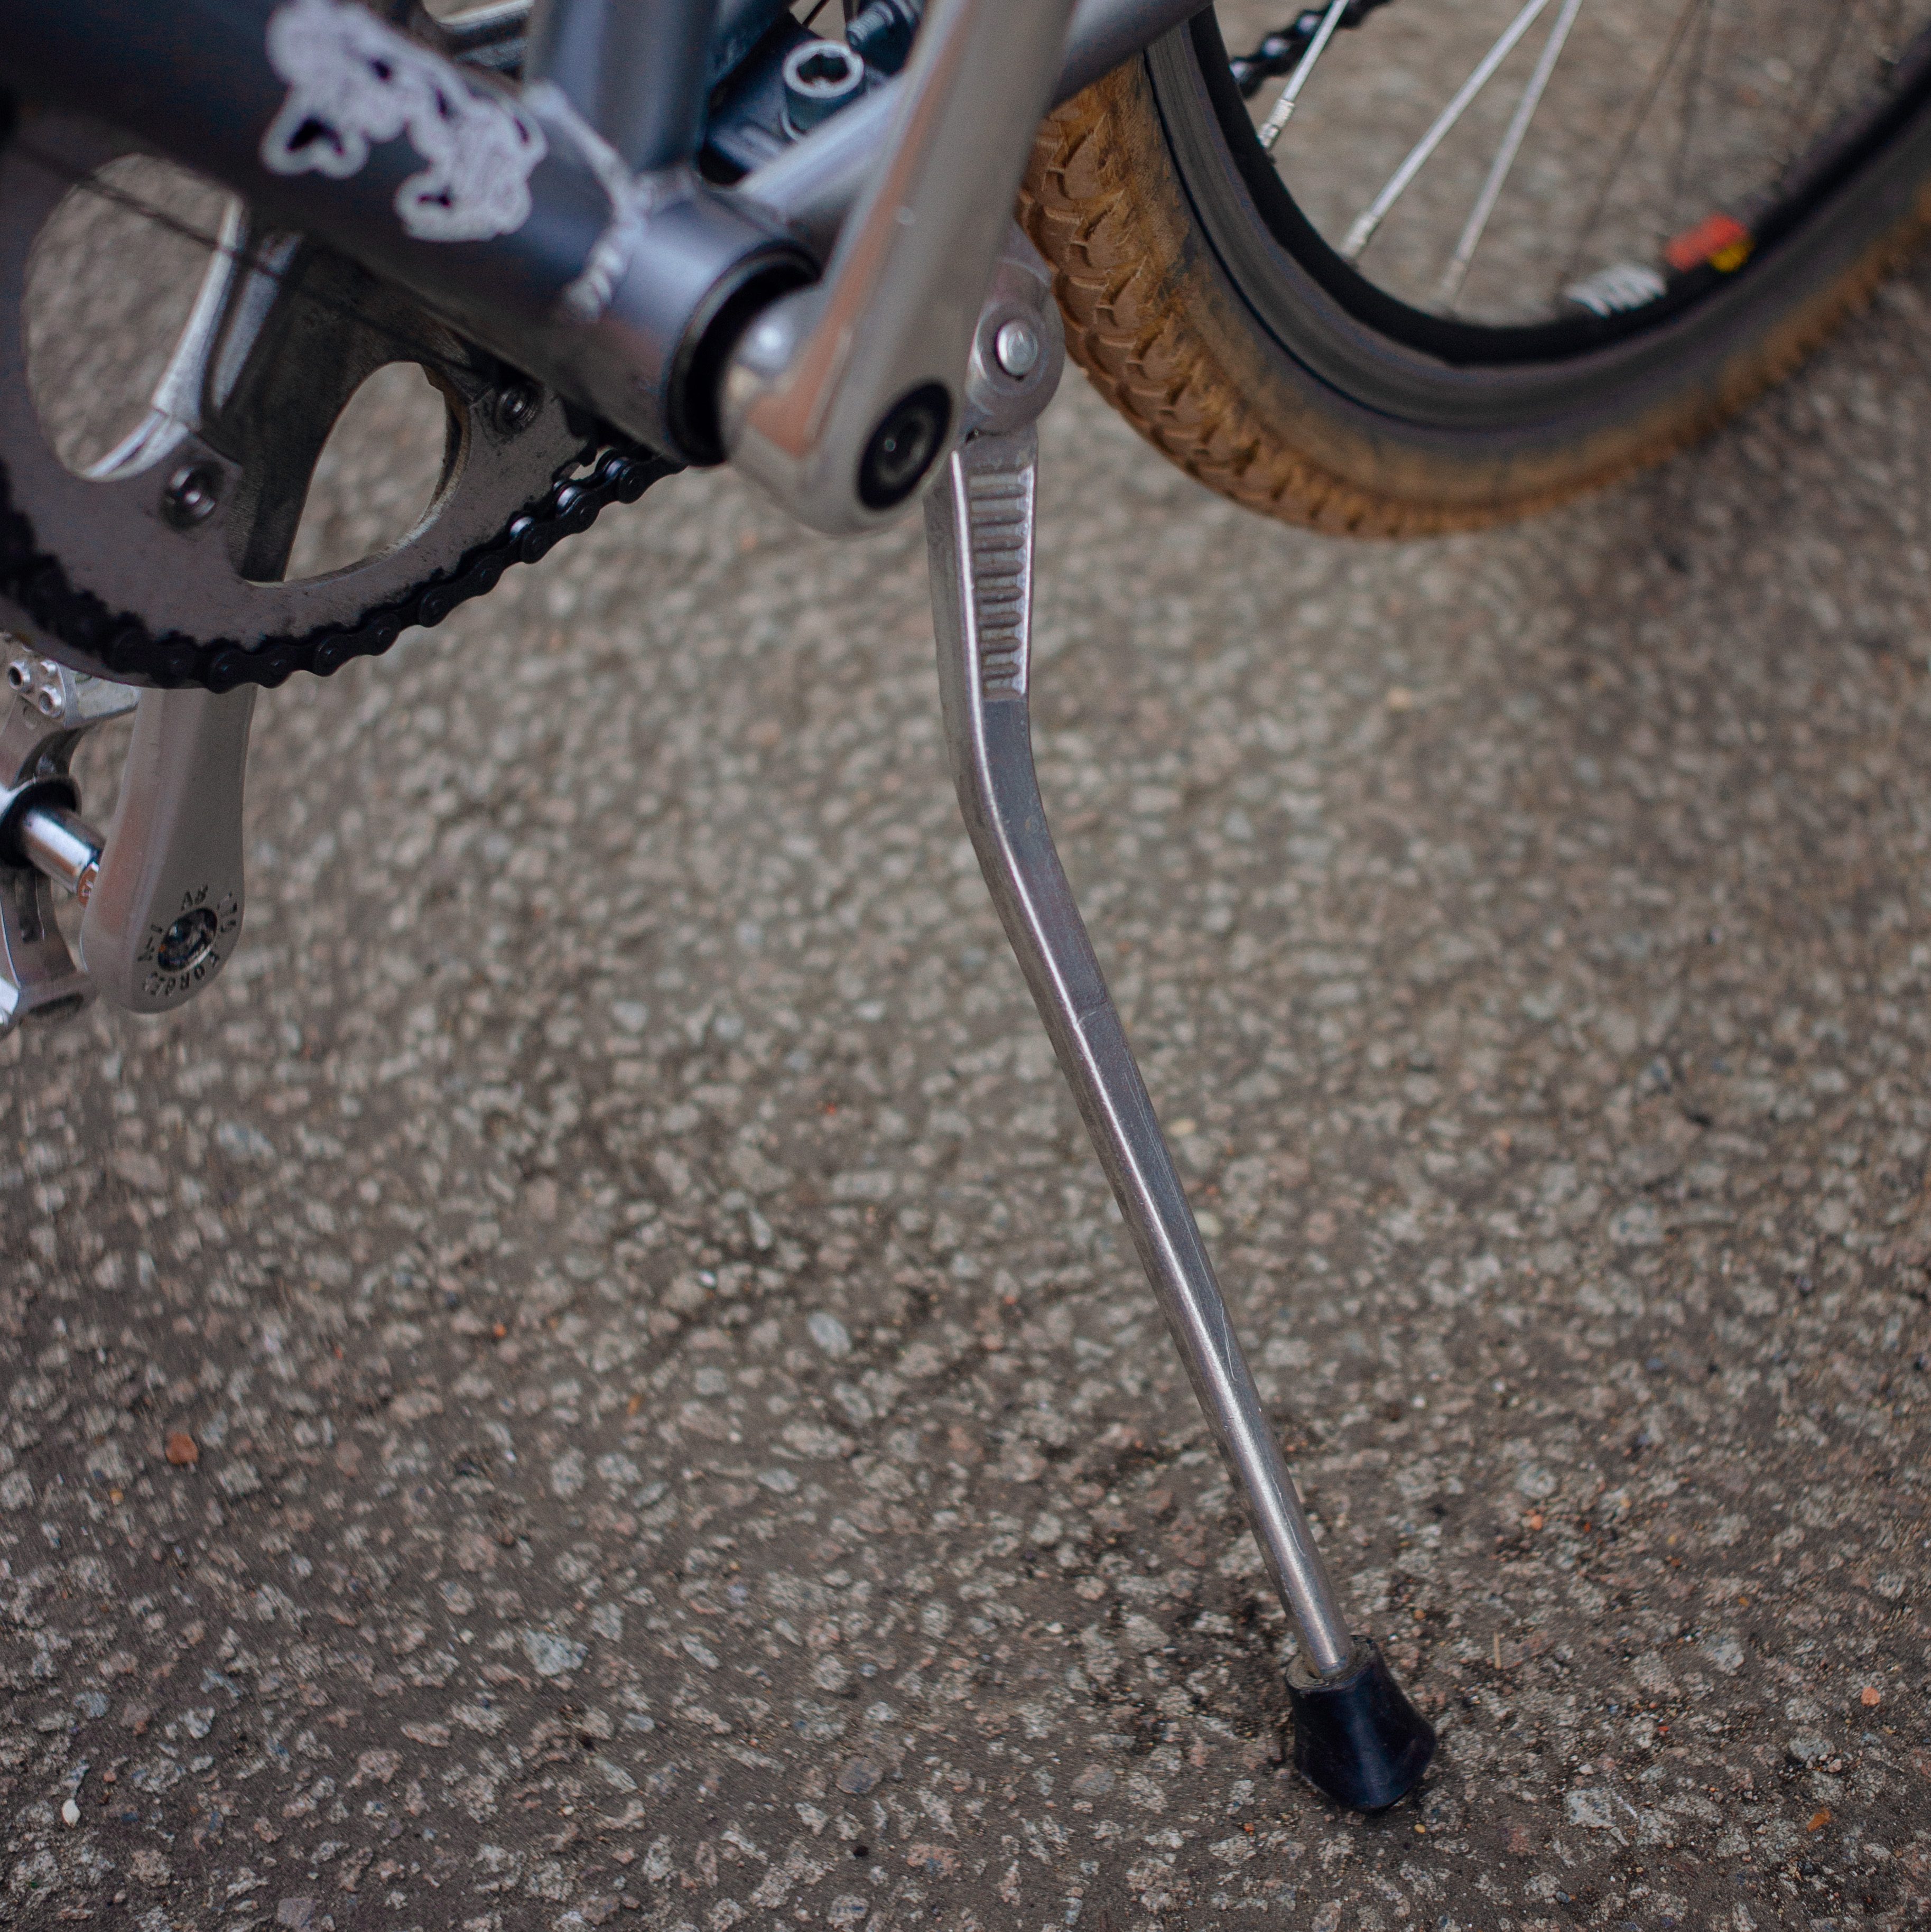
I will preface that the next 4 sections, aren’t a necessity at all, they’re just extra parts that either come with your bike as standard, or don’t. If they’re not there – you might not know how much of a difference they make. And if they are there, they might actually piss you off in all honesty, but I thought it’d be useful to include them as the can be considered as ‘extras’ or ‘useful upgrades.
With that being said, a kickstand. I’d never owned a bike with one until fairly recently – at first I didn’t really get it. Surely I could just lean my bike up against a solid object, right? Well sure, but those new handle bars you just put on have got a big ol’ scuff mark down the side of them now because someone didn’t lean it up correctly. There’s weirdly no argument to why or why not to have a kickstand attached other than, do you like to easily and safely know your bike can stay vertical on its own? Since I moved on from that original bike, I have actually missed being able to just prop it up when I need too. Yes the bike looks ‘sportier’ but sometimes, once you’ve got your basket on, swept handlebars and bags attached, it isn’t about sport anymore.
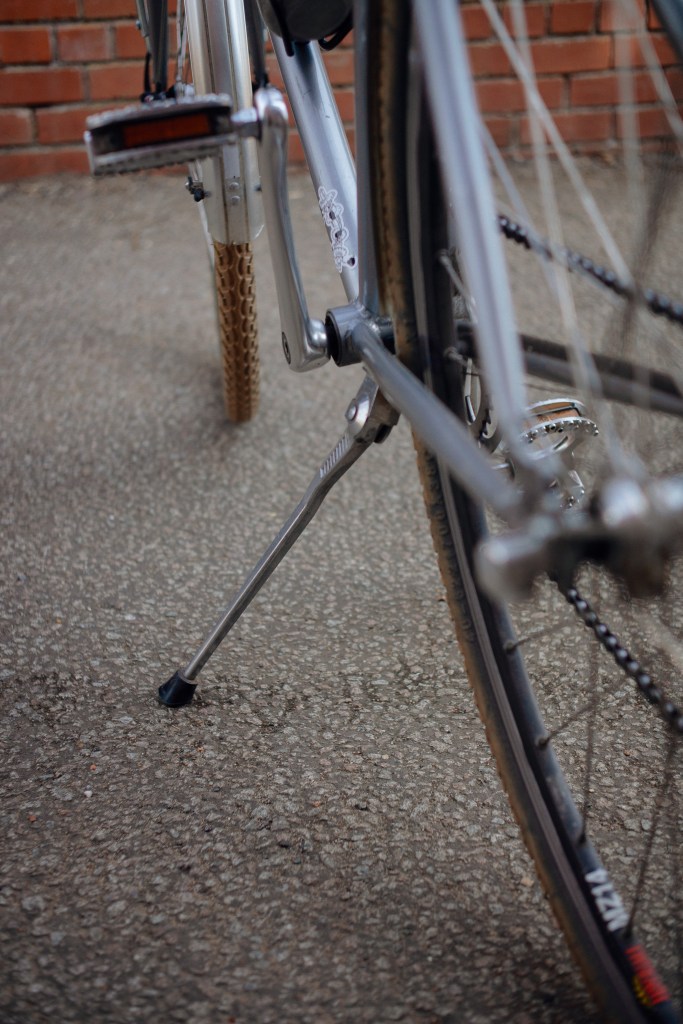
Even the simple task of loading a basket – just being able to have the rear end of the bike supported while you cram stuff on is a nice little extra. Things do admittedly get precarious when you maybe overload it and end up with the front wheel + rack and basket combo have the tendency to violently spin off balance and send your bike flying. But big brain geniuses like Velo Orange again – make this wicked little spring you can mount to your fork and downtube that increases the tension, avoiding any unexpected mishaps due to weight. You’ll find kickstands on most dutch-style city bikes, and that’s for a reason – they’re so useful using them in a city.
Fenders
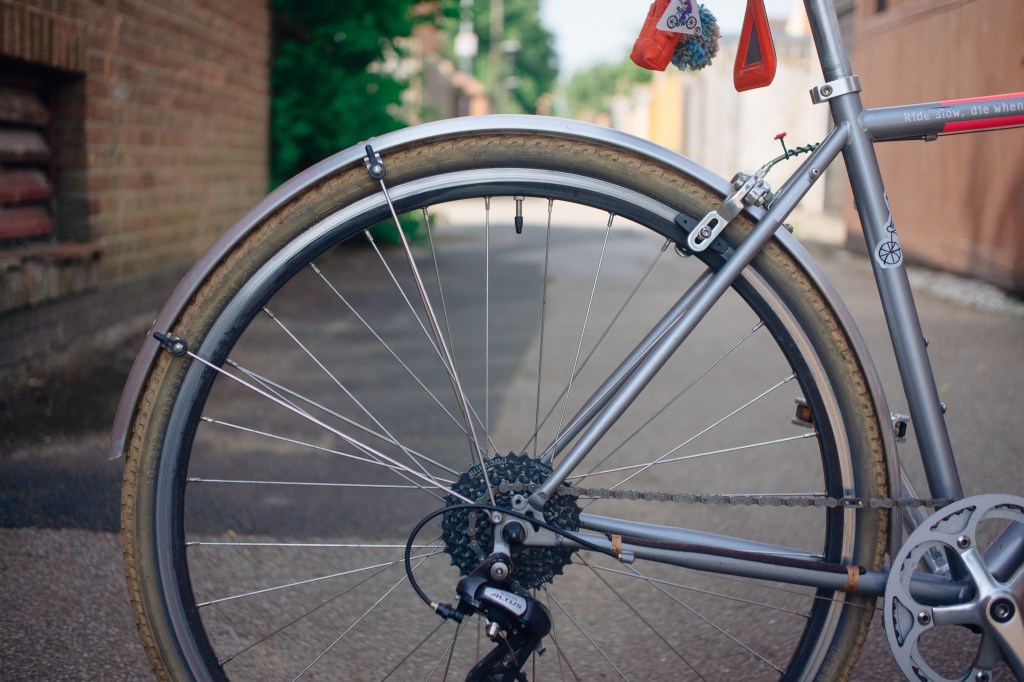
These were what I was referring to when I prefaced these final four items – fenders (or mudguards) are wicked and extremely useful (and they look sick) but, they’re a pain in the chamois to put on most of the time, the nice looking ones are expensive af, and their usefulness is only recognised when it’s raining, which is the point lol. If you’re going in the direction of full fenders (i.e they cover the whole front and back wheel) your options are vast. Fundamentally they all do the same thing, but depending on the material used, you can dictate how easy they are to go on, how much noise they make and how bulletproof they are.
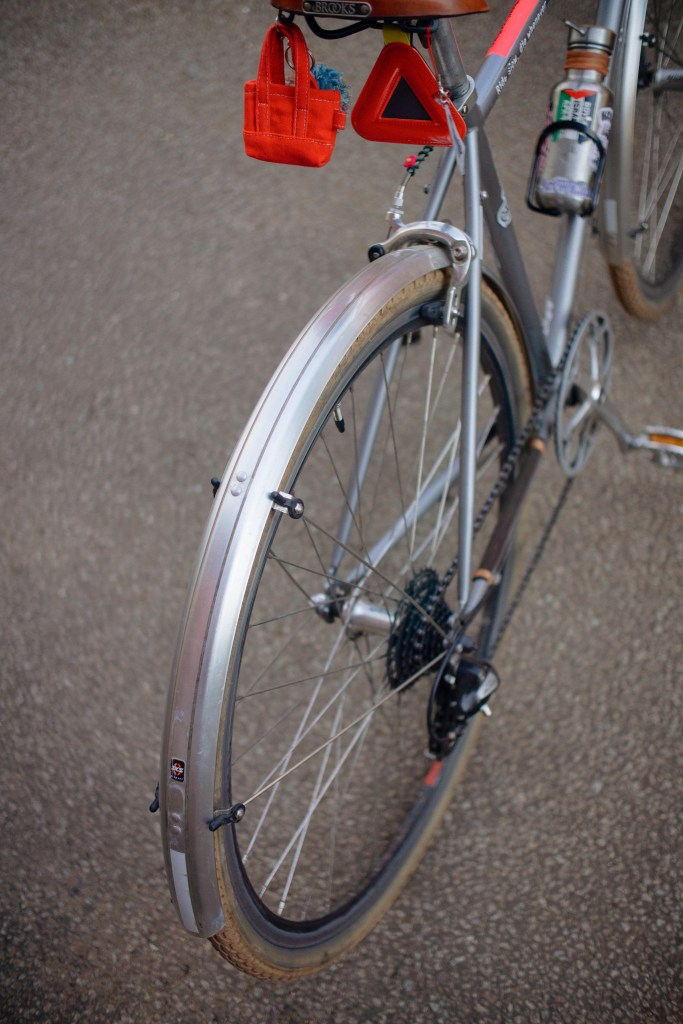
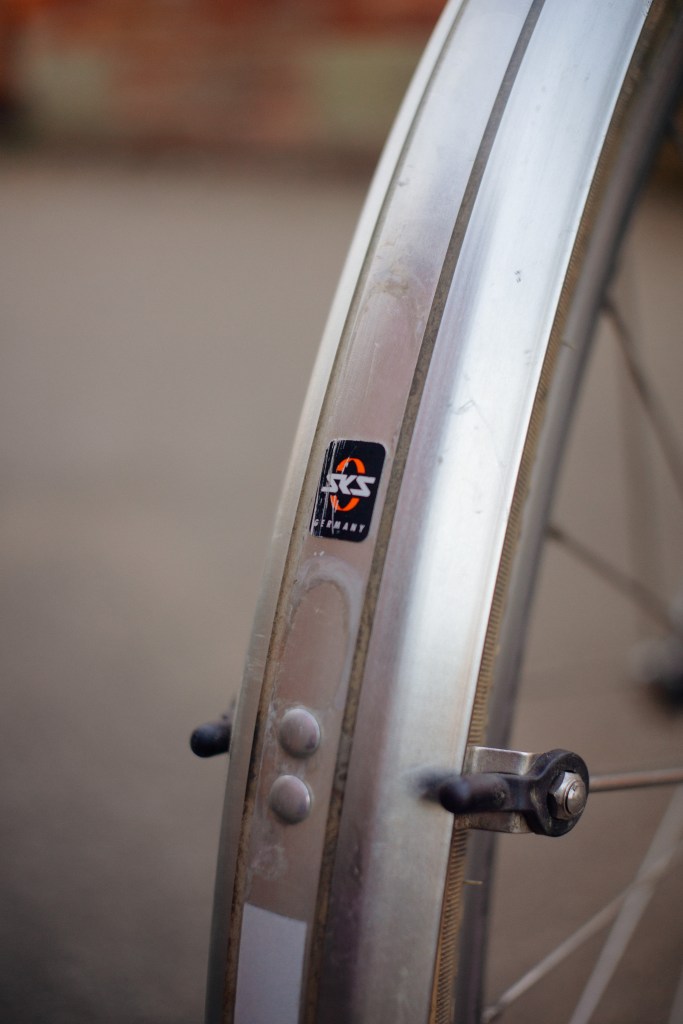
SKS Bluemels are a good start. They go for around £30 or so and are a plastic composite with aluminium struts supporting them. They’ll take a bit of a battering and won’t buckeroo you off if you accidentally suck up a stick which is a big plus. Also, if you go for the silver finish too, they look just as good as the more expensive options such as Honjo, VO again, and most of the Sim Works collab stuff. On the other side of the fender spectrum, is stuff that’s a bit more lightweight and inconspicuous. These nifty little inventions that fold under your seat called Ass Savers. I had one of these on my fixed gear years ago and they actually did save my ass a couple times. The cheap, super easy to add on,
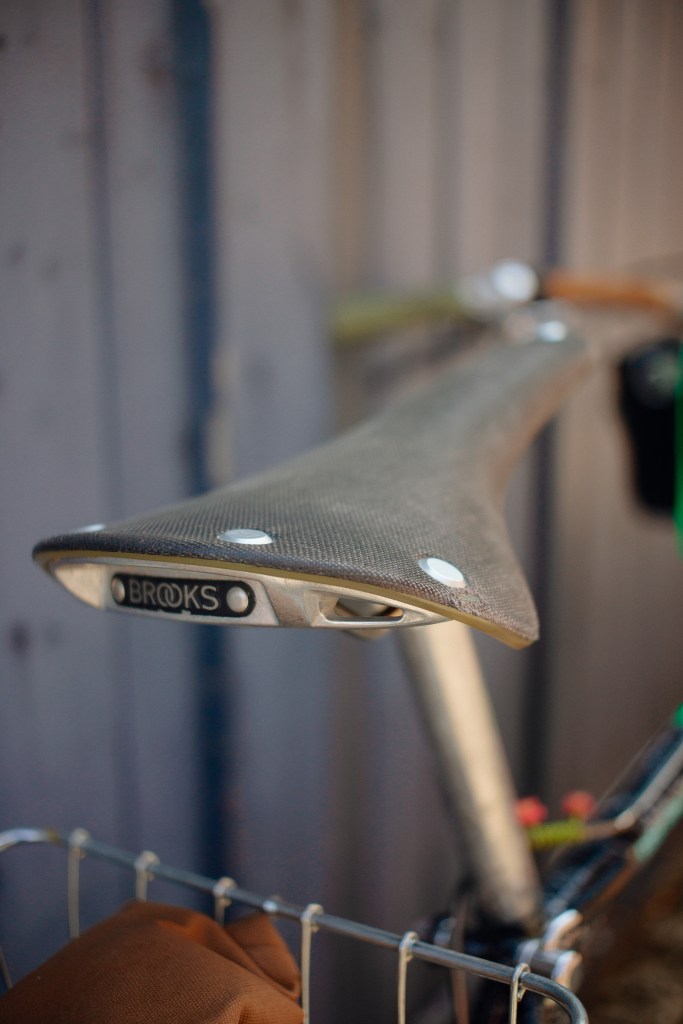
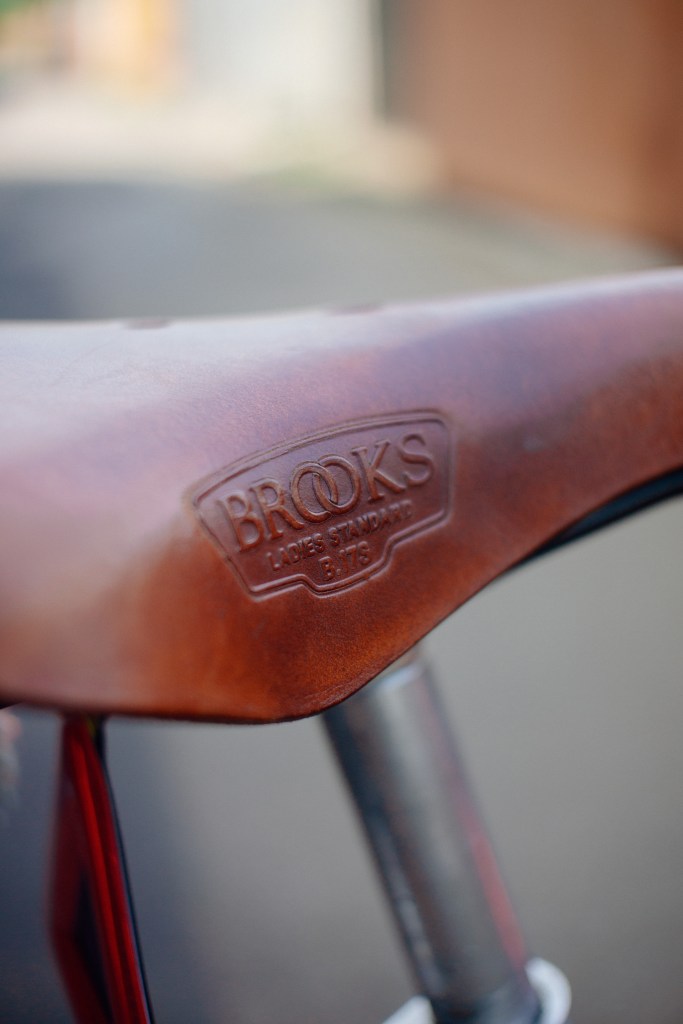
Saddle

Ok – I feel like this is the 17th Hot Take™ for this entire article so far, but, that’s maybe why we’re all here right? We want real-deal human-made reviews and opinions, and I guess we’re gonna get ’em. Here we go: ‘Comfy’ saddles are a myth. I’m talking the ones with the extra gel pads and shit that look like an armchair. They are (not only aesthetically, but functionally too) Full-on Nonsense. There is not a single saddle out there, that will be comfortable when you first start riding a bike consistently. It doesn’t matter how much squiggy gel has been injected into the cheeks of the seat, your ass is gonna hurt regardless if you’re only riding your bike once or twice a month. Want a comfy saddle? you might have to ride a bit more. It’s like getting a nice, new pair of comfy shoes. That air bubble isn’t gonna stop the blisters on the back of your ankles, or your toes being pinched together. What do you do? Wear them more. It’s the same with saddles.

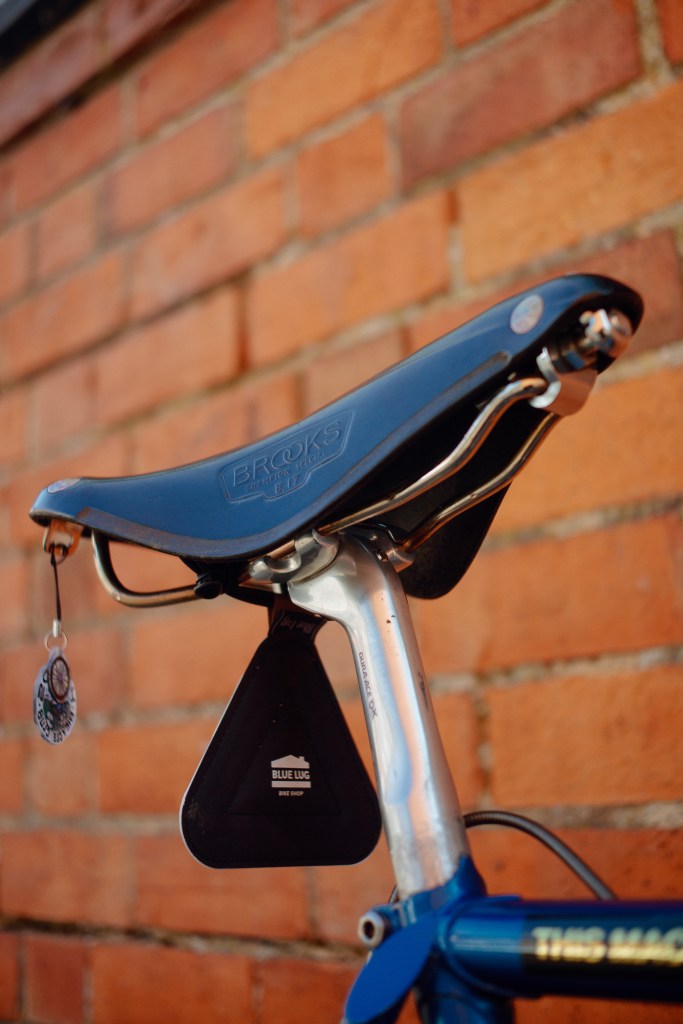
I fully understand how you might feel if it’s your first time getting on a bike and the last thing you want to rest your bum on is a 3D-printed carbon fibre Pringle shaped thing. Surely, the next logical step must be to get the plump-est, most cushioned saddle you can find? Wrong. The correct answer is to psychologically accept the fact that when you decide to start riding a bike, It is going to be uncomfortable. That is the point. You can try and soften saddles and adjust its height so it’s slammed to the top of the frame like a BMX but all it’s gonna do, is make you hate it. You want something that will fit to your shape downstairs, and support it at the correct height too.
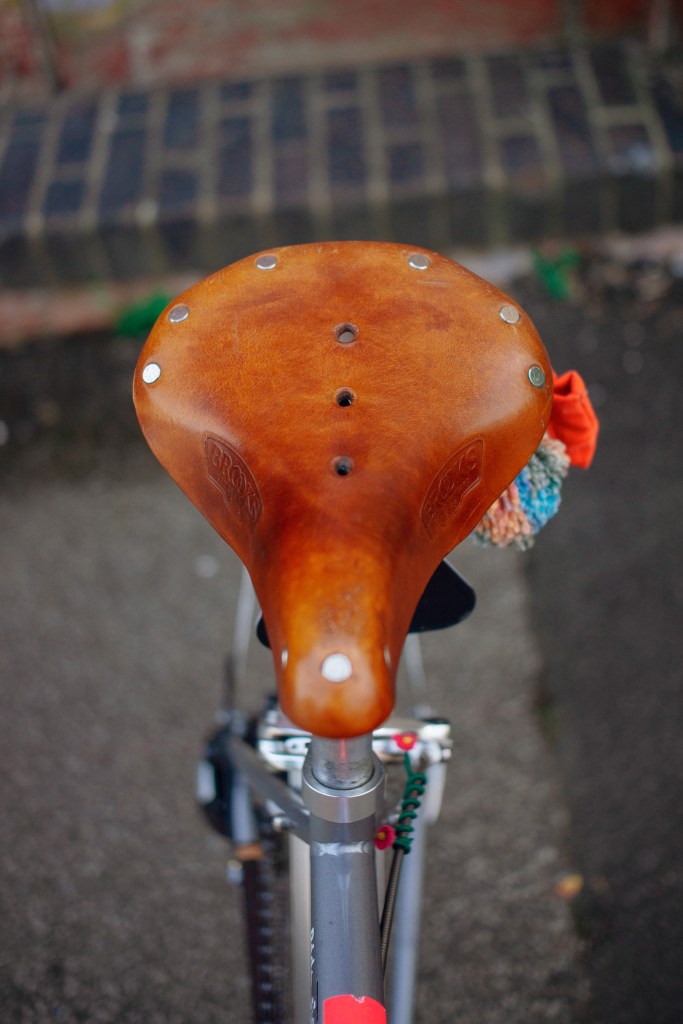
Because not only is it just about insuring your nether-regions aren’t getting bruised, it’s also to make sure you can actually pedal the bike. If you’ve ever wondered why your knees hurt after riding a bike, it’s because your saddle isn’t high enough. I know – blew my mind the first time I found that out too. When your saddle is too low, you put a ridiculous amount of strain on your knee joints, which in turn, results in a really horrible ache in your knees. The second you start to send that saddle to the sky, you’ll literally feel the pain evaporate. Try it, and if I’m full of shit then comment below.
Pedals
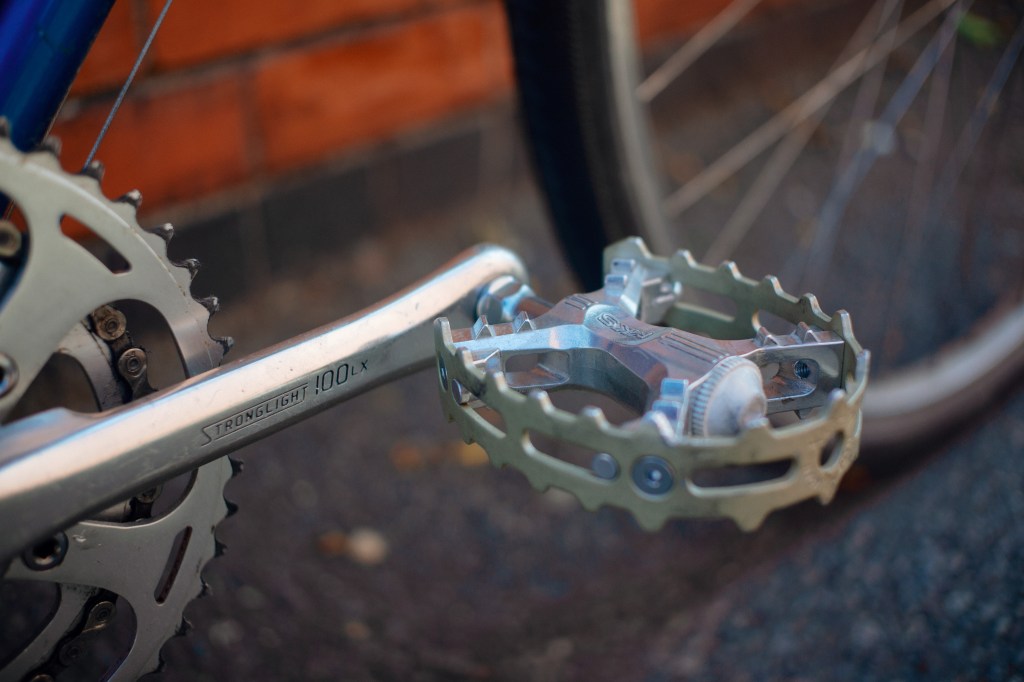
I was indecisive about whether or not to include pedals on this list, just because they are, in a lot of cases, just an after thought. I also wasn’t going to include a Handlebars section because I felt that by that point I would be basically suggesting to change everything your bike came shipped with. But, Pedals are pretty inexpensive and relatively easy to switch up. Bars on the other hand can be spenny, and a can of worms if you don’t know what you’re doing. Anyway, the reason I thought I would add these was because they made such a huge difference to my gf’s riding ability that it was hard to ignore.
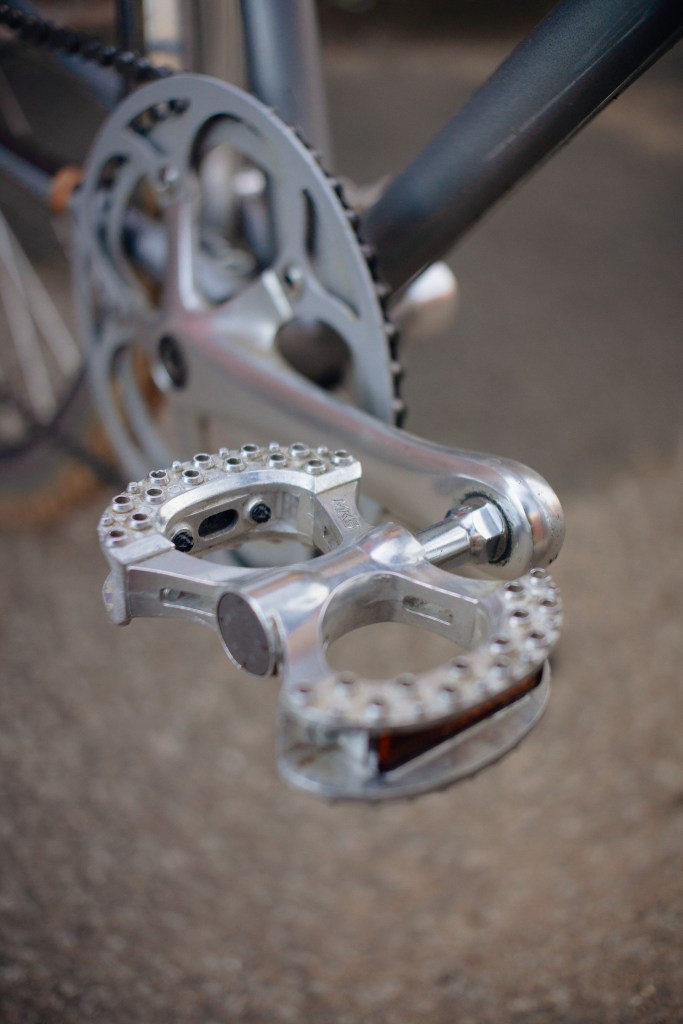
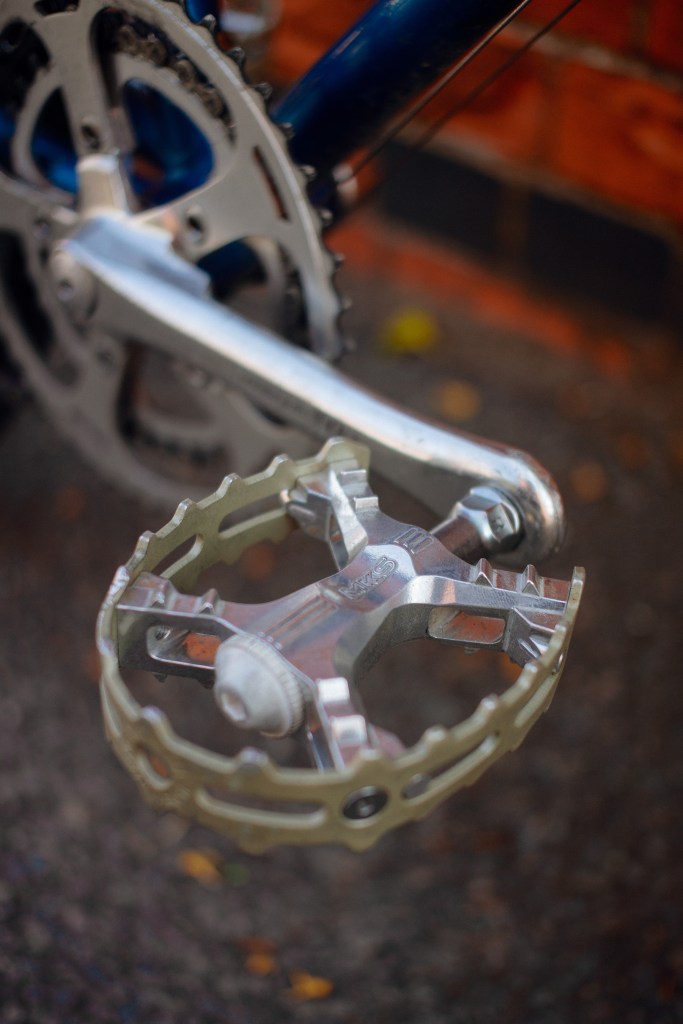
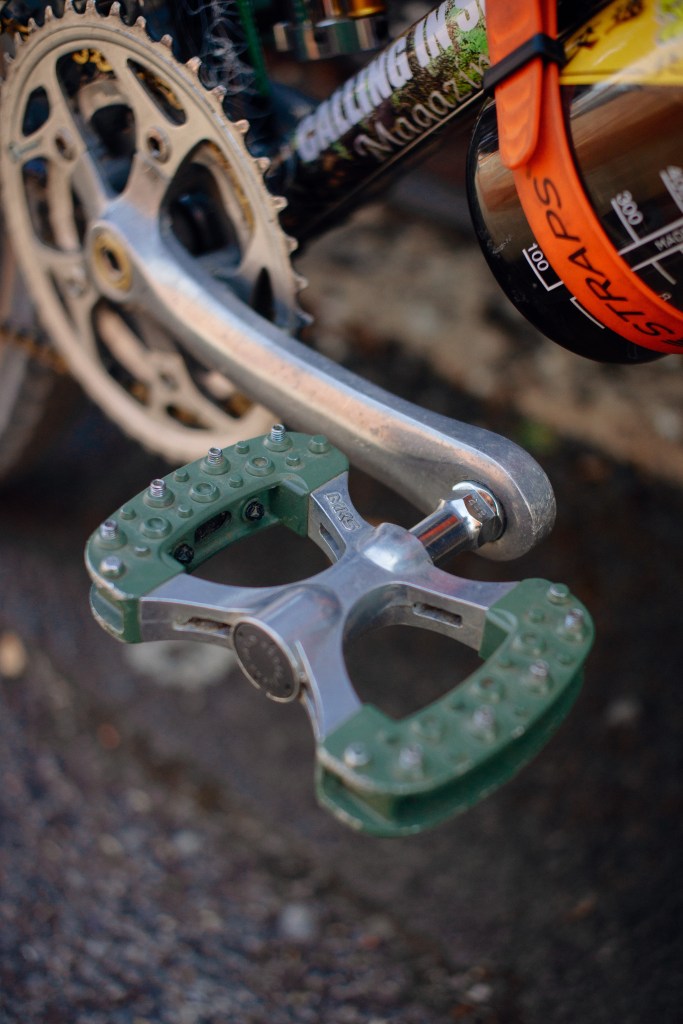
The bike she was riding previously was a classic Halfords special Ladies Bike®. Weirdly, the pedals that it shipped with, were tiny. I didn’t actually notice at first, it was only when I rode it once after servicing her brakes that I realised just how small and plastic they were. I’d wondered why she was always struggling with setting off, they’d always be some sort of adjustment before she could start riding a bike when lights changed or once a car had passed. I mentioned to her and she confirmed that “yeah, it’s really hard to get my foot on there properly”. I had a spare pair of MKS lambda pedals and swapped hers out for them. The difference was night and day. Other than the fact that they supported almost her entire foot now, they let her get more power into the bike and therefore more stability.
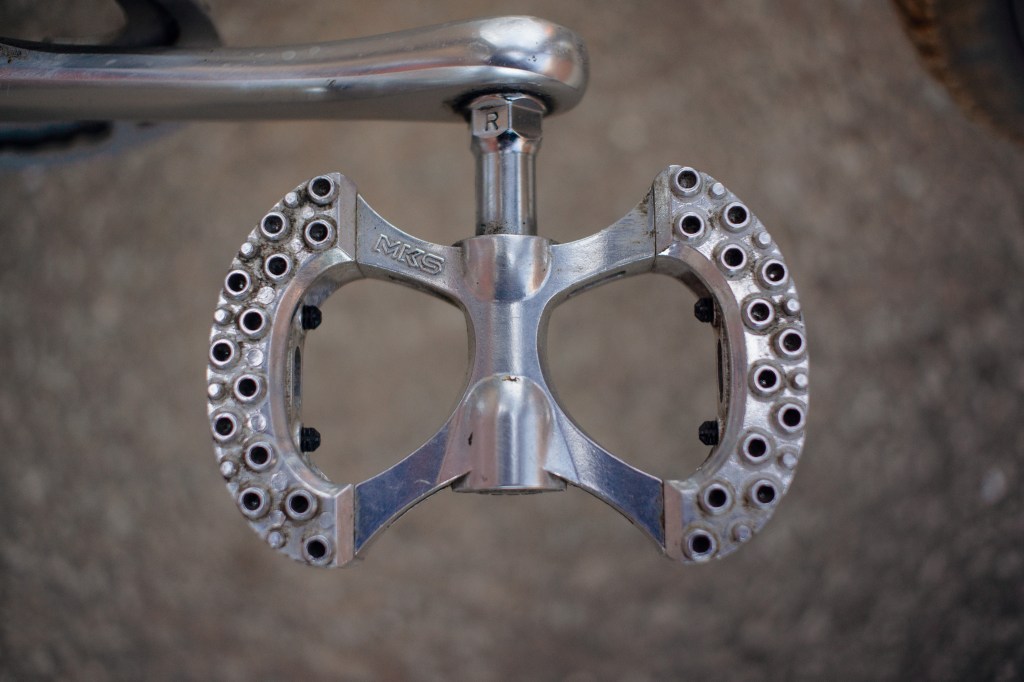
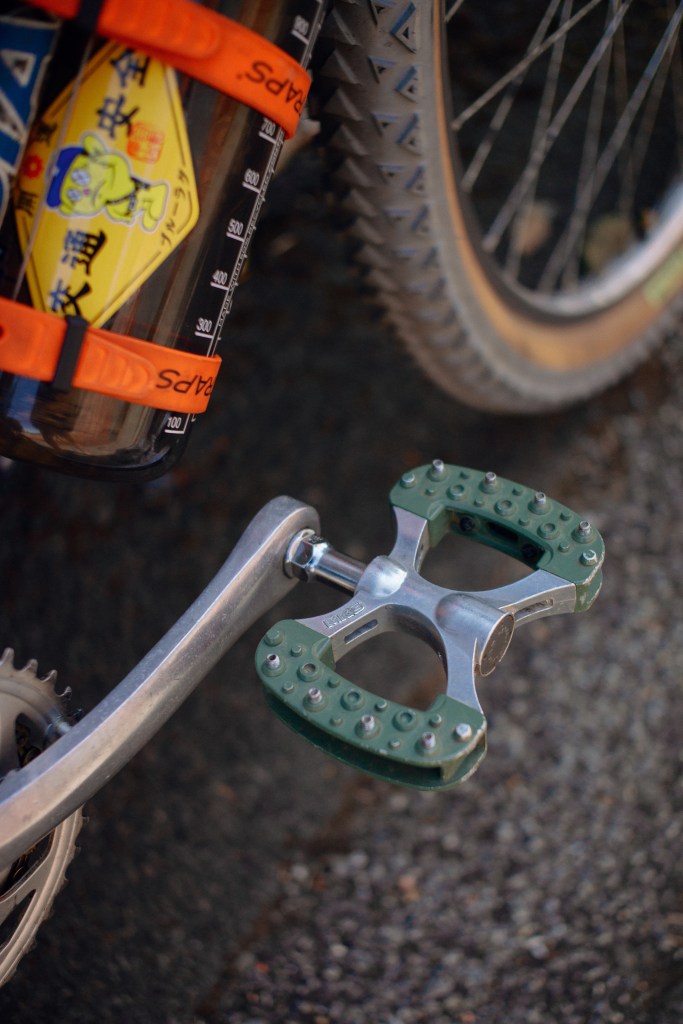
They’re also pretty nice to look at which is always a bonus. I know I’ve heard before that the most important parts of enjoying a bike are getting your ‘contact points’ (Bars/grips, Saddle and Pedals) right. This upgrade will obviously be dependent on what your bike has already shipped with, and how big ya feet are. Look for something that’ll give you a nice amount of support and platform, and leave the clip-ins for the Professionals™.
Software
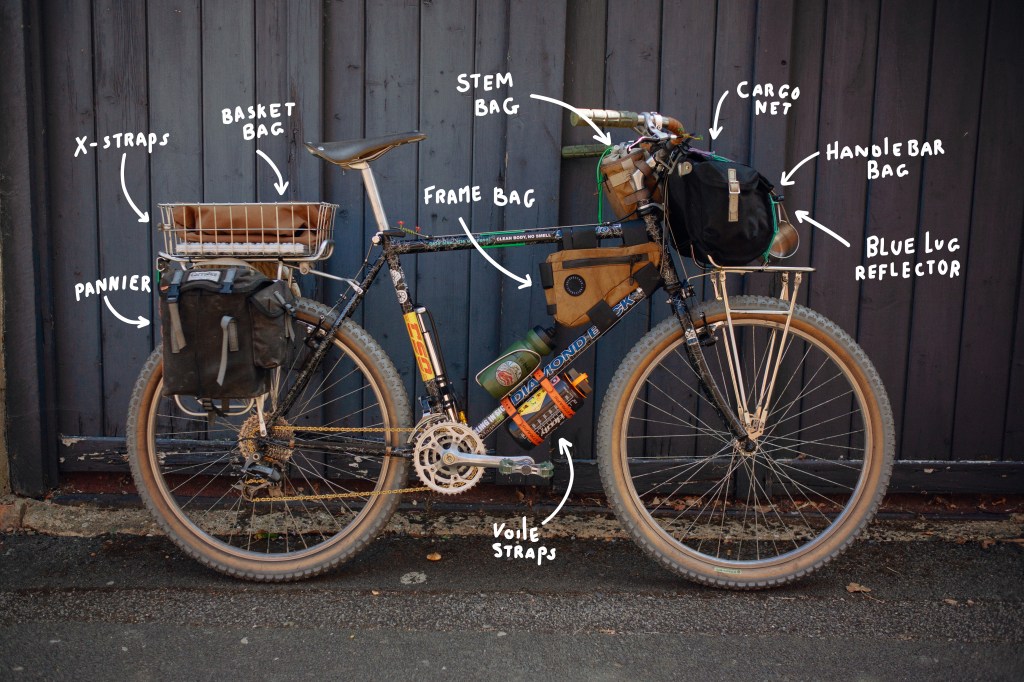
Bags
Finally, we arrive at my personal favourite – the accessories. This is the stuff that really sucked me down the rabbit hole when I first started riding again. I’d owned and ridden multiple bikes before, but other than the odd sticker here and there, I’d never really given it a bit more personality than a couple skate stickers slapped on the top tube.
My dad likes to remind me of how much I disliked his Panniers he added to his Marin back in the day. I thought they made it look like an ‘old mans’ bike. Tbf, I was a kid, and now, considering I’m basically an old man, panniers are back baby. It was only when I first saw a picture of a fully loaded Rivendell, ready for a camping trip, that I began to feel new synapses connecting in my brain. I’d always had this idea of a mythical ‘dream bike’ in my head, but I had never seen, or known that it was possible, and did in fact exist. Handlebar bags, frame bags, stem bags, saddle bags, pannier bags, fork bags – the whole shebang. The moment was then cemented when I came across this video not long after finding that pic. What the hell is this shop called ‘Blue Lug‘? Why do I feel like I’ve been here before? (I hadn’t) Something felt familiar. It was like the first time I went to the original Slam City Skates store in Neal’s Yard. I felt at home, regardless of the fact I was watching this random dude’s YouTube video, thousands of miles away.
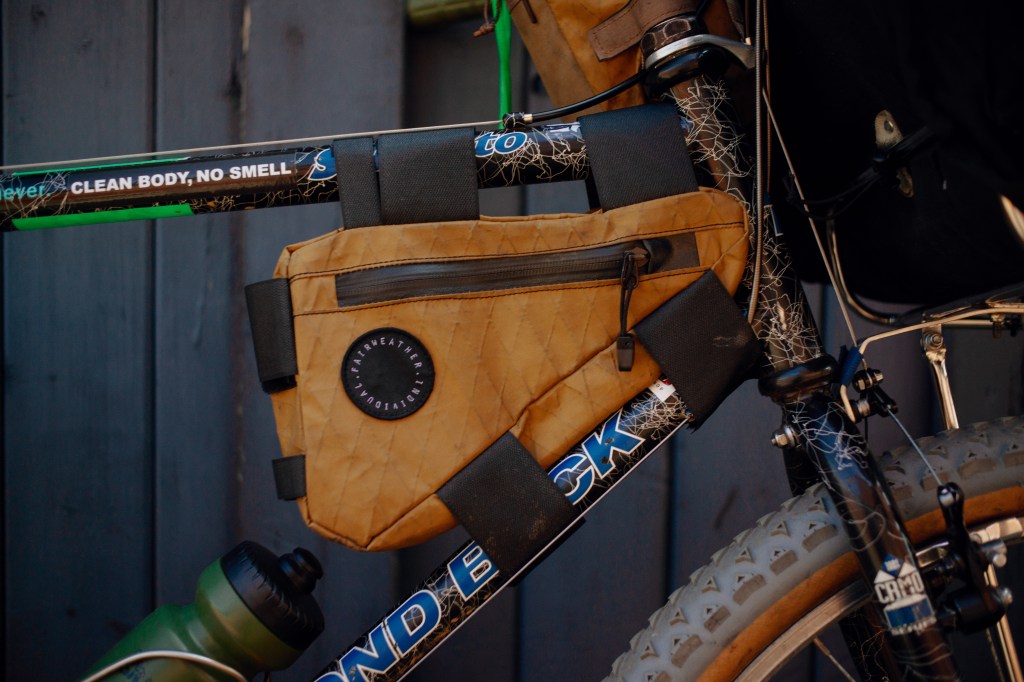
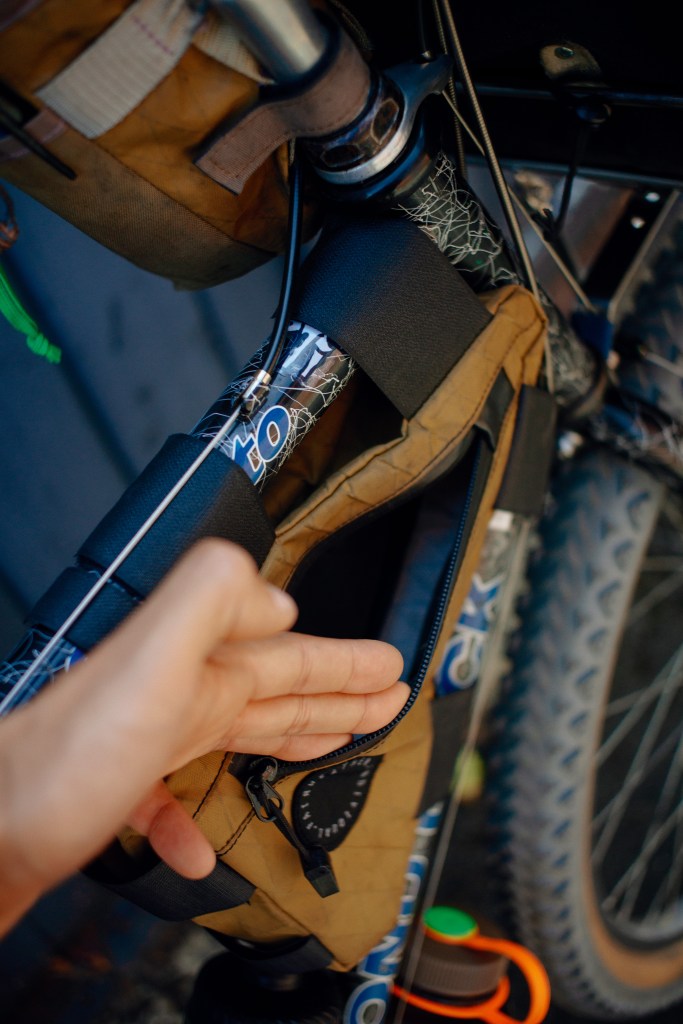
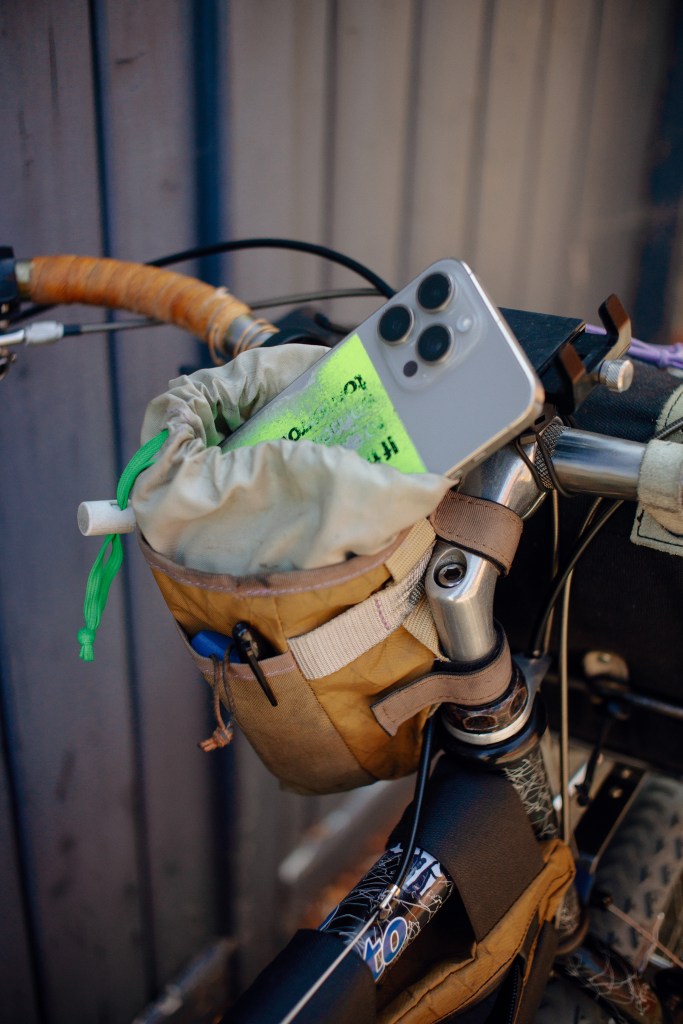
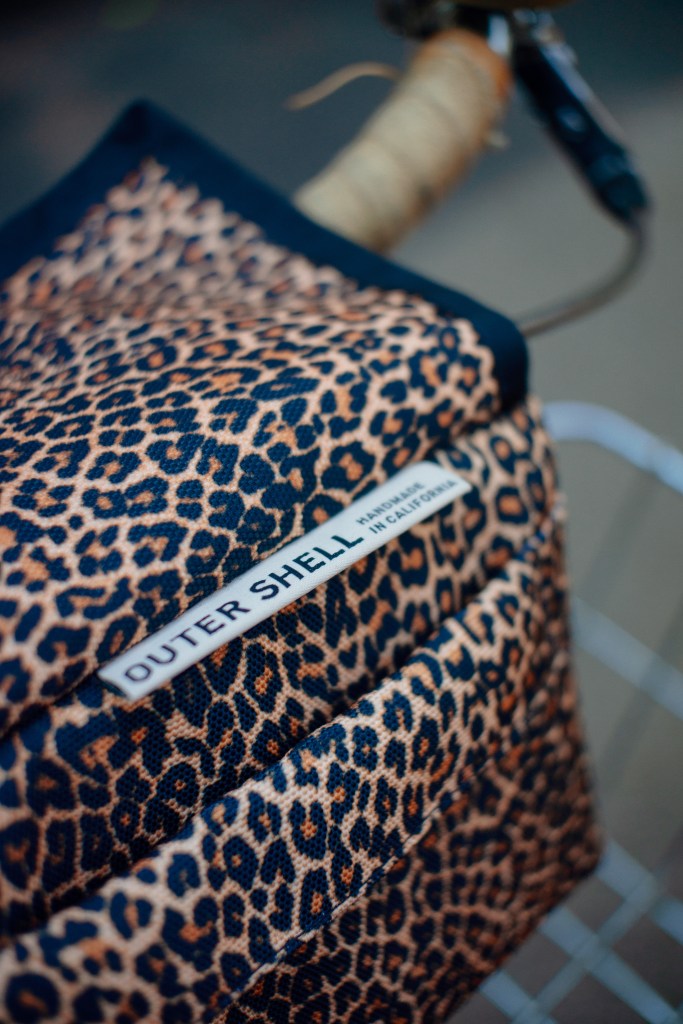
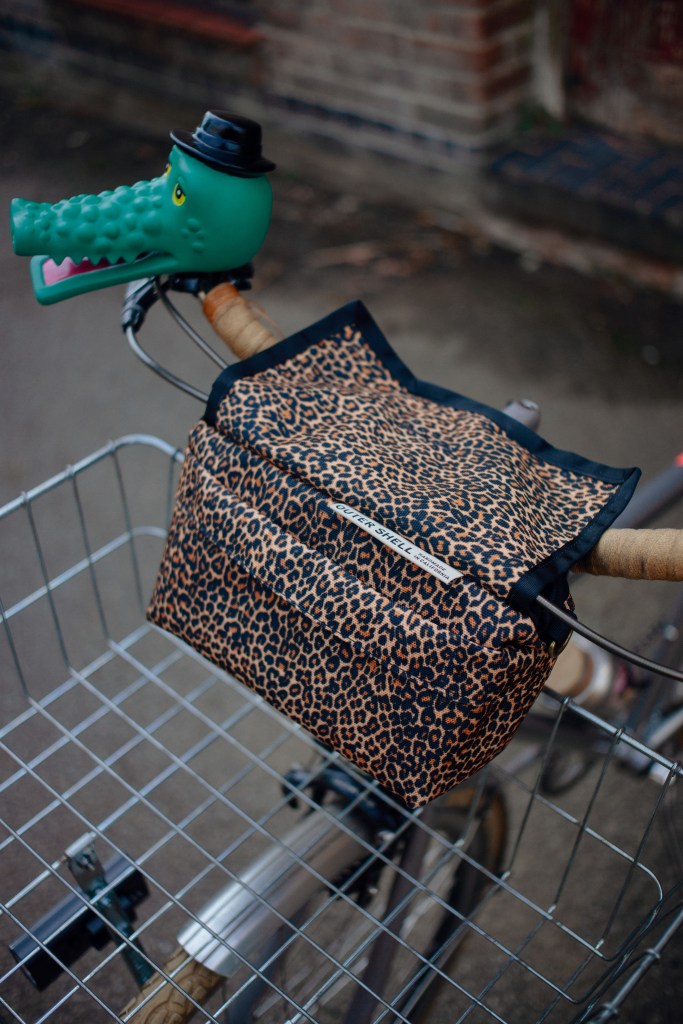
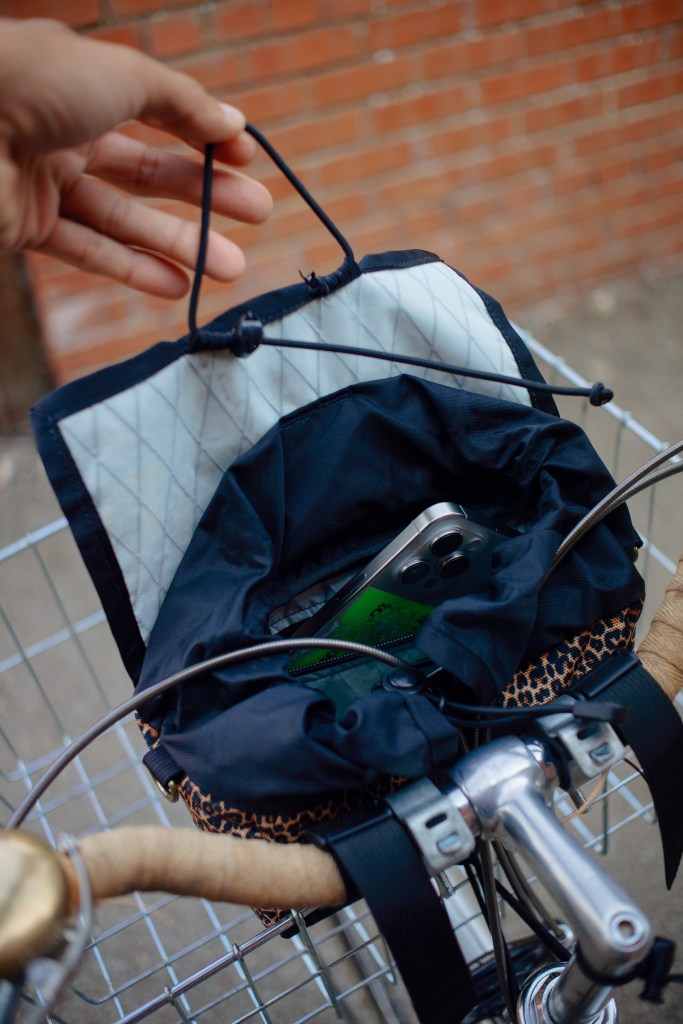
Anyway, I digress. You get the gist. Bags are fucking cool anyway, and they’re even cooler on a bike – not only that, but they’re fucking useful too lol. My personal everyday bag for my bike is a stem bag. They’re normally designed to carry a water bottle, but they double up perfectly for carrying your tools, lights, phone and anything else you need at a short reach while riding. My gf has gone for a similarly placed option from Outershell, but attached to the handlebars instead.
There’s so many options out there that it really is up to you, and your riding style, on how and what you use, I feel that my job is more of one to alert you to their existence. Places like Tokyo bike stock a load of bits from Blue Lug, Fairweather, RAL and Outershell. Also, Freshtripe in Cambridge carry a wicked selection from Swift Industries. And The Woods Cyclery has some niche bits from Ron’s Bikes occasionally. There’s also some awesome UK-based companies like Wizard Works,Zola Works & BitsByBee that are independent, local and rad – they’ll also put together custom designs or colour variations for you if you’re into that sorta shit.

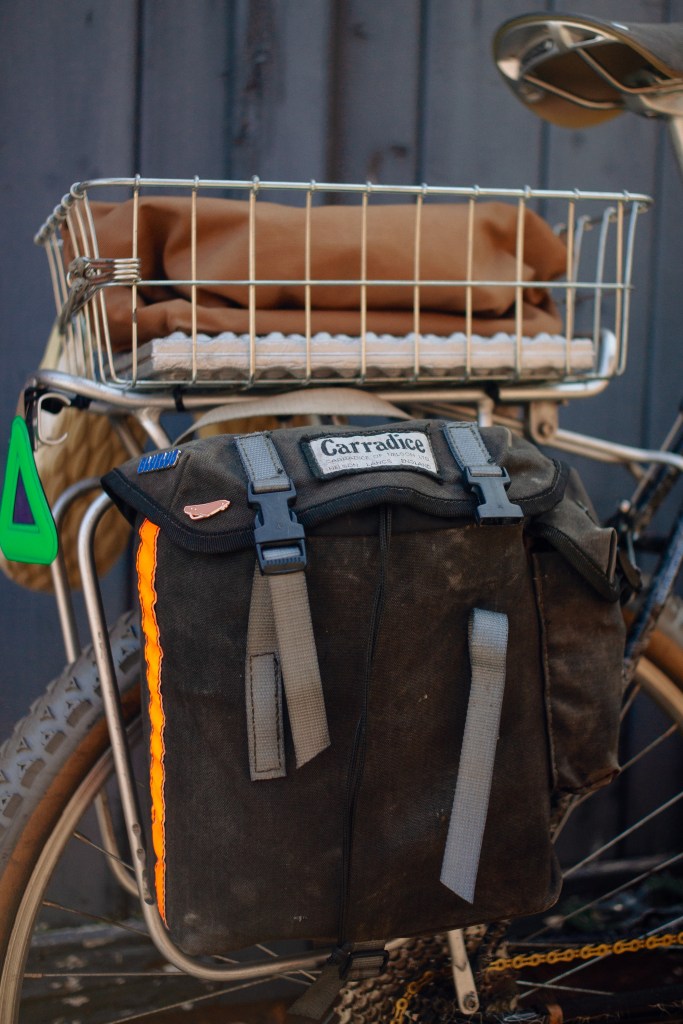
Finally there’s Lancashire-based Carradice; an oldskool ‘made in England’ brand. I’ve been using their Nelson bag for longer trips and camping. Other than it being a beautifully crafted product, hanging beneath a Brooks saddle, it also doesn’t break the bank (some of the other’s mentioned come in at a pretty penny).
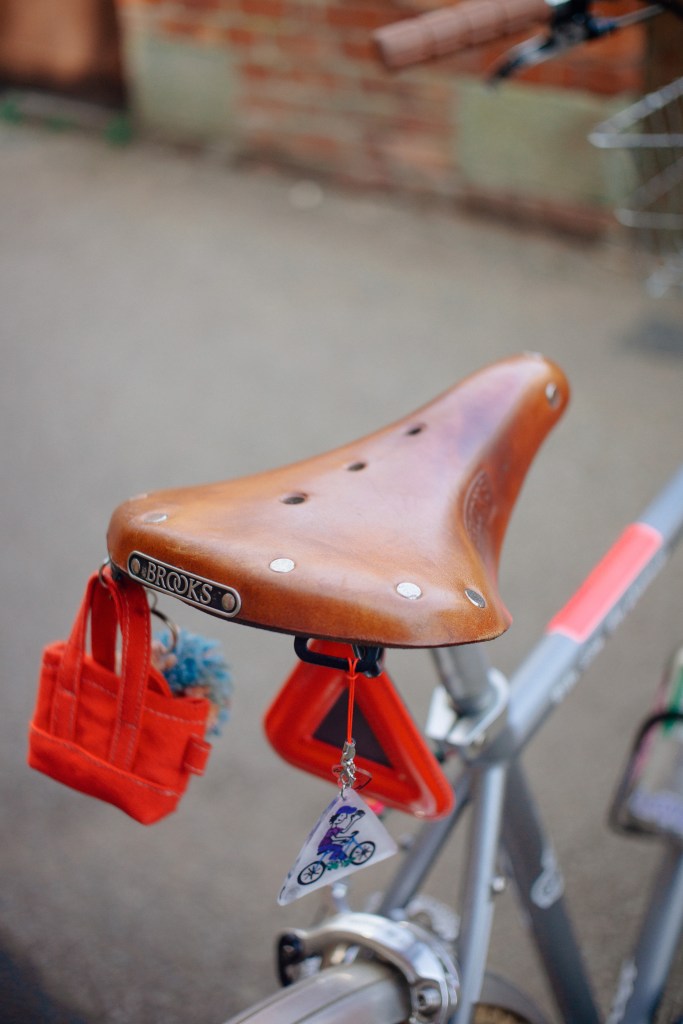
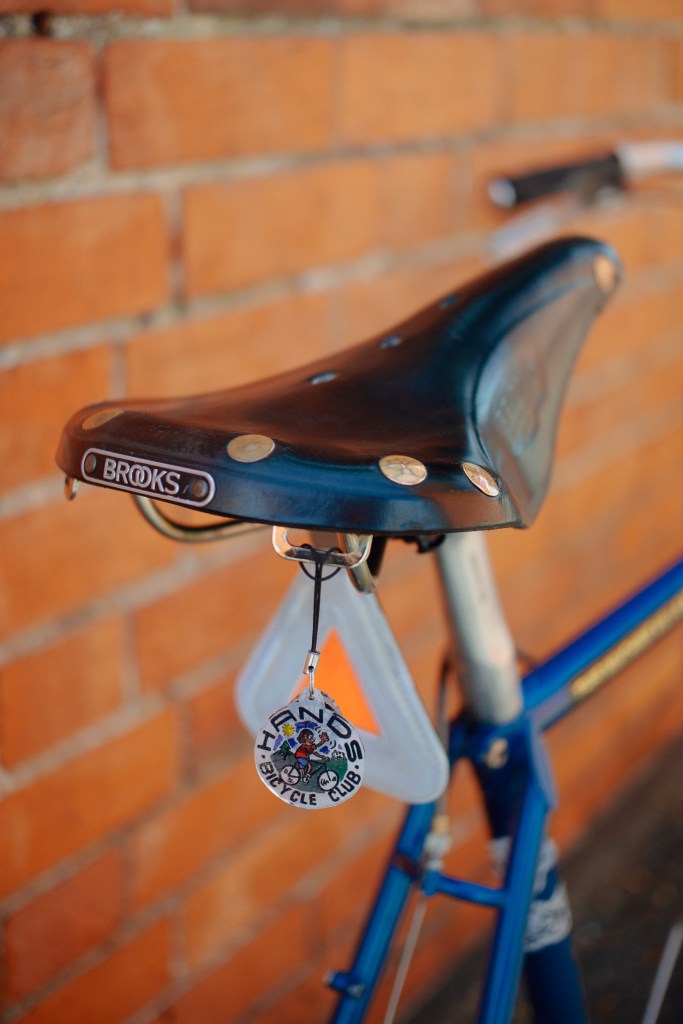
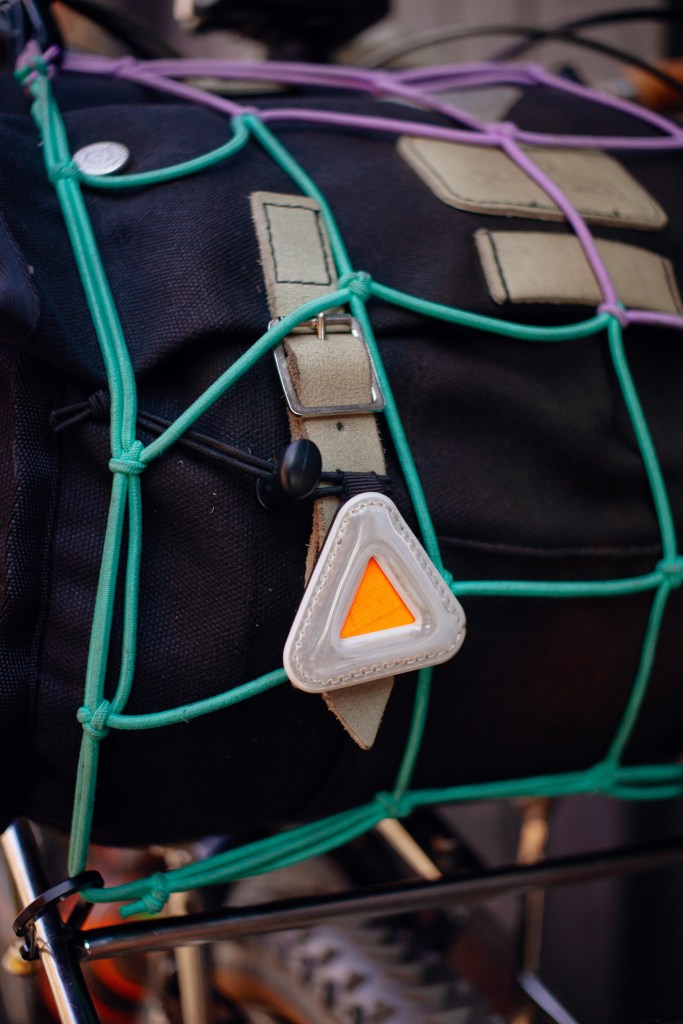
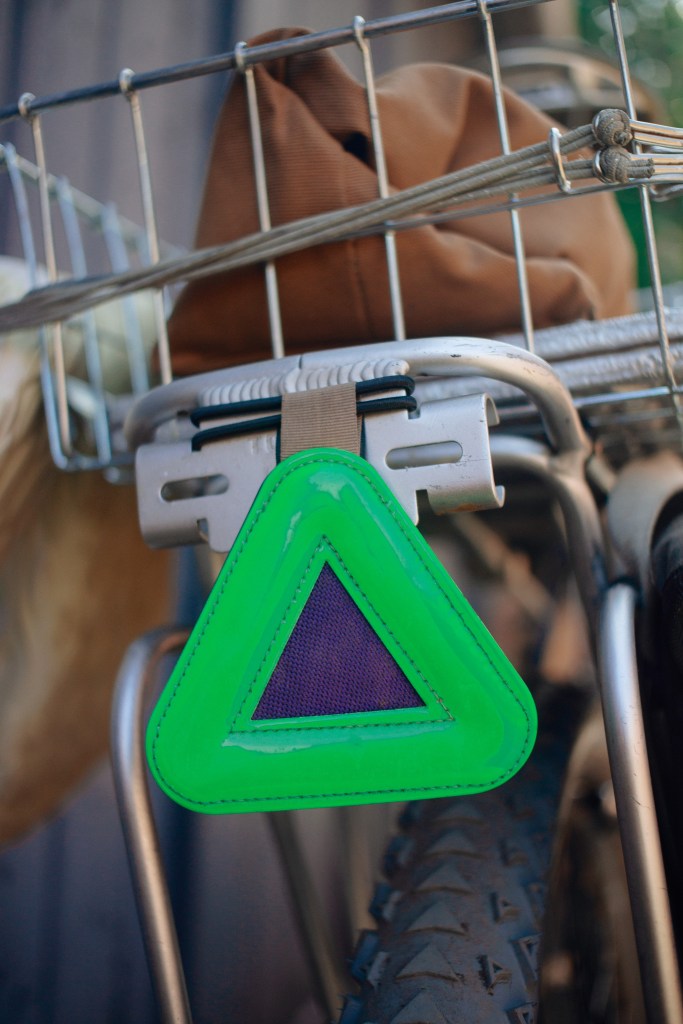
Reflectors
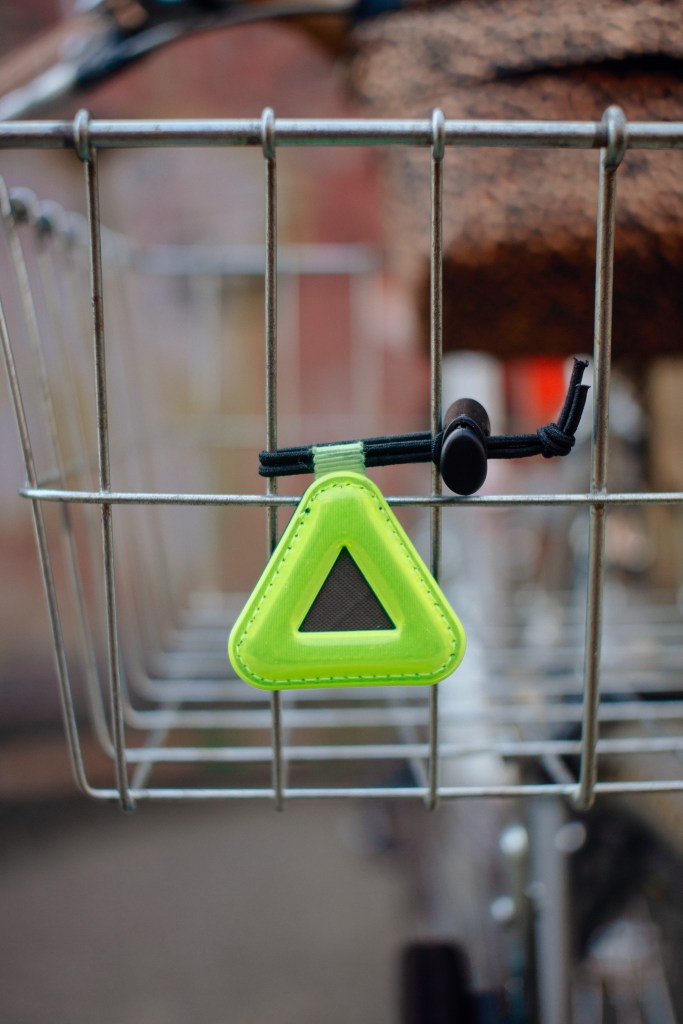
Normally, the first thing I do when I get a bike (like I assume most of you) is take the plastic reflectors off. The weird ones mounted to the front and rear, and especially the ones on the wheel spokes. I haven’t changed at all, but, I have spent a considerable amount of money in the last few months, putting reflectors back on.
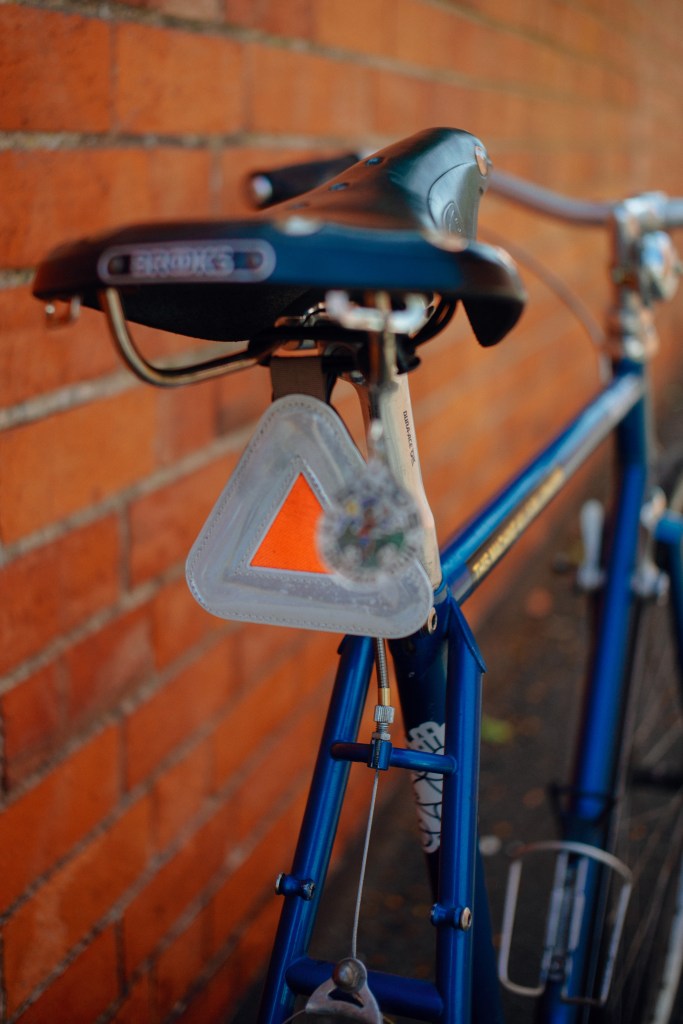
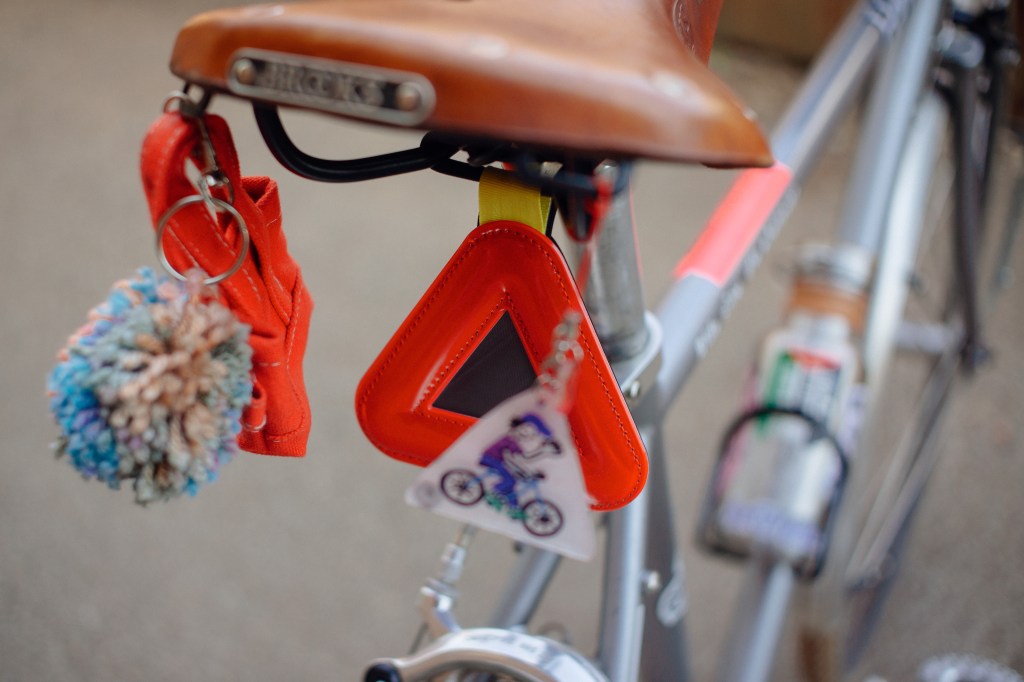
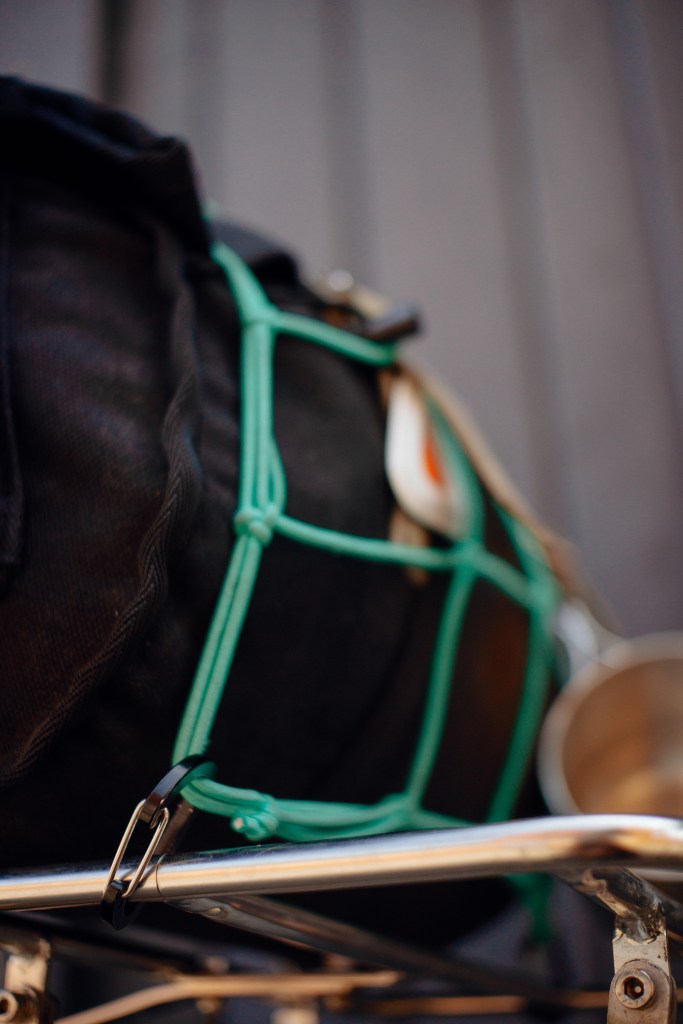
That’s right. No, not the spoke ones, these ones: The Blue Lug triangle reflector. mount them under your saddle, to the front of you basket, on your keys; Anywhere you might want to be seen. They’re a rad little idea and because they have every colour combination under the sun, you can match them to pretty much anything you want.There’s a couple other companies out there, one makes a similar shaped offering but its decorated to look like a pizza slice, hence the name: Safety Pizza. Blue Lug even do one that looks like a Onigiri. Genius right? The possibilities of formats these things come in are quite literally endless, so check ’em out – they’re great if you’re in a pinch at night too, they really do light up quite well.
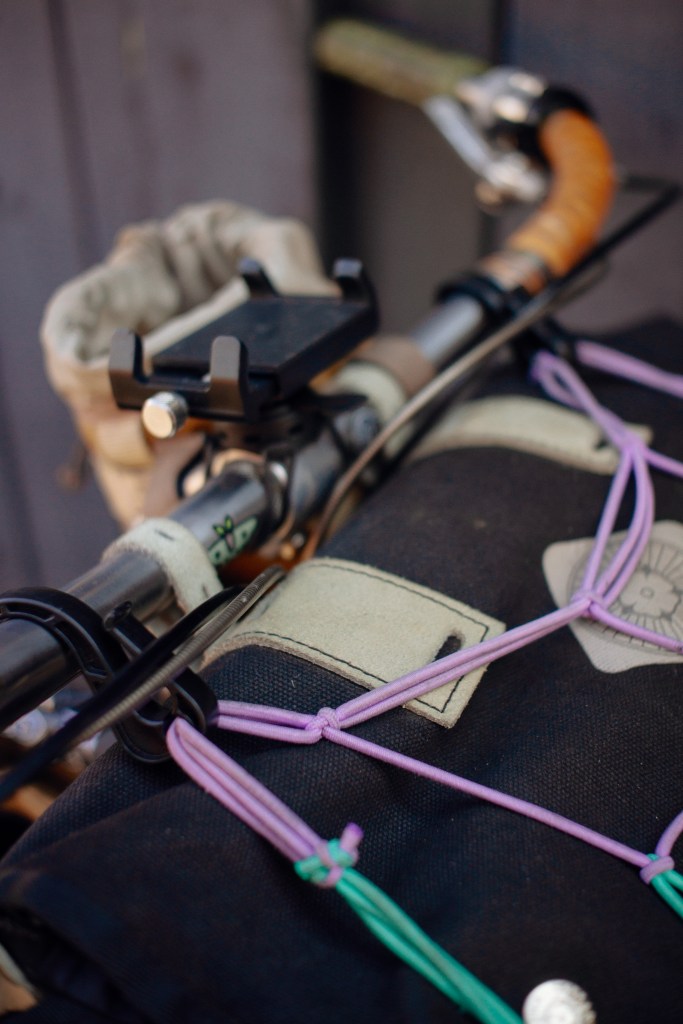
Straps

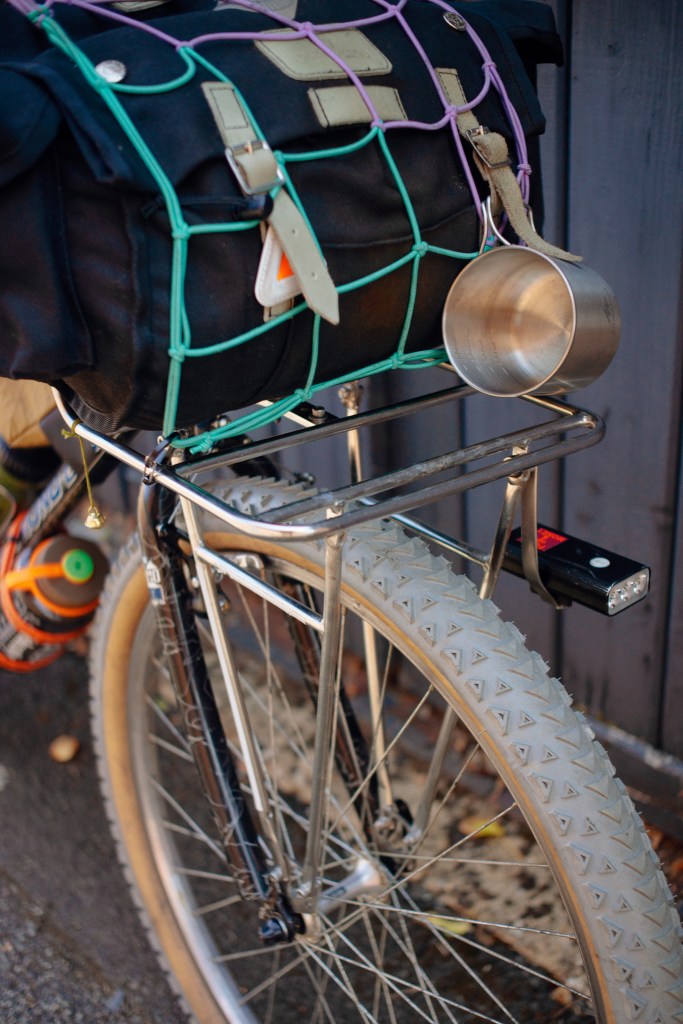
Now you’ve got all the racks, baskets and mounts under the sun loaded on, you need to keep things strapped down. Let me introduce you to the humble Voile Strap. Built to keep all manner of shit firmly attached to parts of your bike, you might not even of intended to attach things. They come in a variety of lengths, strengths and fastenings to suit your needed application. I’m using here to hold my Nalgene water bottle to save some space elsewhere.
Alternatively, for more everyday purposes, you can find innovations on the basic bungee cord from Blue Lug, they make these incredibly versatile straps when combined with a basket. One form is the X–Strap, great for holding bags in baskets with minimal fuss.
The Cargo net is another offering from the geniuses at Blue Lug, but it is possible to pick these up from most other places too. I’ve used mine to keep my handle bar bag secured but also if I want to stuff a jumper (or anything else) quickly onto the top for easy access.
This concludes our lesson today, class. Thank you for participating, and well done if you made it this far – we’ll be picking this up over the summer with some extra-curricular activities to refresh your brains, just in case. For those of you that have stuck around till then end, take this: *Obtained Token*…
We’re gonna be holding a monthly bike clinic at Blackened Sun/Barista Culture. The whole thing is in partnership with the Crüe at Sabbath Cycles, there’s gonna be more on all of this soon enough but for now – let it be known that Hands® Resident Ryderz will get a 10% off labour on repairs or services. We want to keep you all rolling, so – big thank you to Chris, Gary, Georgie and Tom for making this all happen. Love to all of you.

Leave a comment